I have a full list of success tips, as well as a video tutorial and step-by-step photos, so make sure you browse this post before getting started. I can’t wait for you to try these at home!
.tasty-recipes-image {
float: right; }
.tasty-recipes-yield-scale {
border: 1px solid #979599;
border-radius: 2px;
color: #979599;
margin-left: 3px;
padding: 0 4px;
font-size: 0.7rem; }
.tasty-recipes-scale-container {
float: right;
padding: 0 0 1rem;
display: -webkit-box;
display: flex; }
.tasty-recipes-scale-container .tasty-recipes-scale-label {
text-transform: uppercase;
font-size: 0.6rem;
color: #979599;
align-self: center; }
.tasty-recipes-scale-container button {
background: transparent;
border: 1px solid #979599;
border-radius: 2px;
color: #979599;
margin-left: 5px;
padding: 2px 4px; }
.tasty-recipes-scale-container button.tasty-recipes-scale-button-active {
color: #353547;
border-color: #353547; }
.tasty-recipes-scale-container button:focus {
outline: none; }
.tasty-recipes-video-toggle-container {
float: right;
padding: 0 0 1rem;
display: -webkit-box;
display: flex; }
.tasty-recipes-video-toggle-container .tasty-recipes-video-toggle-outer-label {
text-transform: uppercase;
font-size: 0.6rem;
color: #979599;
align-self: center;
margin-right: 5px; }
.tasty-recipes-video-toggle-container .tasty-recipes-video-toggle {
position: relative;
width: 70px;
-webkit-user-select: none;
-moz-user-select: none;
-ms-user-select: none; }
.tasty-recipes-video-toggle-container .tasty-recipes-video-toggle-checkbox {
display: none; }
.tasty-recipes-video-toggle-container .tasty-recipes-video-toggle-label {
display: block;
overflow: hidden;
cursor: pointer;
border-radius: 2px;
margin: 0; }
.tasty-recipes-video-toggle-container .tasty-recipes-video-toggle-inner {
display: block;
width: 200%;
margin-left: -100%;
-webkit-transition: margin 0.3s ease-in 0s;
transition: margin 0.3s ease-in 0s; }
.tasty-recipes-video-toggle-container .tasty-recipes-video-toggle-inner:before, .tasty-recipes-video-toggle-container .tasty-recipes-video-toggle-inner:after {
display: block;
float: left;
width: 50%;
height: 30px;
padding: 0;
line-height: 30px;
font-size: 14px;
color: white;
font-family: Trebuchet, Arial, sans-serif;
font-weight: bold;
box-sizing: border-box; }
.tasty-recipes-video-toggle-container .tasty-recipes-video-toggle-inner:before {
content: “ON”;
padding-left: 10px;
background-color: #89969F;
color: #FFFFFF; }
.tasty-recipes-video-toggle-container .tasty-recipes-video-toggle-inner:after {
content: “OFF”;
padding-right: 10px;
background-color: #EEEEEE;
color: #999999;
text-align: right; }
.tasty-recipes-video-toggle-container .tasty-recipes-video-toggle-switch {
display: block;
width: 18px;
margin: 6px;
background: #FFFFFF;
position: absolute;
top: 0;
bottom: 0;
right: 36px;
border-radius: 2px;
-webkit-transition: all 0.3s ease-in 0s;
transition: all 0.3s ease-in 0s; }
.tasty-recipes-video-toggle-container .tasty-recipes-video-toggle-checkbox:checked + .tasty-recipes-video-toggle-label .tasty-recipes-video-toggle-inner {
margin-left: 0; }
.tasty-recipes-video-toggle-container .tasty-recipes-video-toggle-checkbox:checked + .tasty-recipes-video-toggle-label .tasty-recipes-video-toggle-switch {
right: 0px; }
.tasty-recipes-print-button {
background-color: #666677;
display: inline-block;
padding-left: 1em;
padding-right: 1em;
padding-top: 0.5em;
padding-bottom: 0.5em;
text-decoration: none; }
a.tasty-recipes-print-button {
color: #fff; }
a.tasty-recipes-print-button:hover {
color: #fff;
background-color: rgb(102, 102, 119, 0.6);
}
.tasty-recipes-equipment {
display: -webkit-box;
display: flex;
flex-wrap: wrap;
-webkit-box-pack: space-evenly;
justify-content: space-evenly; }
.tasty-recipes-equipment > h3 {
-webkit-box-flex: 0;
flex: 0 0 100%; }
.tasty-recipes-equipment .tasty-link-card {
-webkit-box-flex: 0;
flex: 0 0 50%;
padding: 1.5rem 1rem;
text-align: center; }
@media screen and (min-width: 500px) {
.tasty-recipes-equipment .tasty-link-card {
-webkit-box-flex: 0;
flex: 0 0 33%; } }
.tasty-recipes-equipment .tasty-link-card p {
font-weight: bold;
font-size: 1em;
margin-bottom: 0; }
.tasty-recipes-equipment .tasty-link-card p a {
color: initial; }
.tasty-recipes-equipment .tasty-link-card span {
font-size: 0.9em; }
.tasty-recipes-rating.tasty-recipes-clip-10 {
-webkit-clip-path: polygon(0 0, 10% 0%, 10% 100%, 0% 100%);
clip-path: polygon(0 0, 10% 0%, 10% 100%, 0% 100%); }
.tasty-recipes-rating.tasty-recipes-clip-20 {
-webkit-clip-path: polygon(0 0, 20% 0%, 20% 100%, 0% 100%);
clip-path: polygon(0 0, 20% 0%, 20% 100%, 0% 100%); }
.tasty-recipes-rating.tasty-recipes-clip-30 {
-webkit-clip-path: polygon(0 0, 30% 0%, 30% 100%, 0% 100%);
clip-path: polygon(0 0, 30% 0%, 30% 100%, 0% 100%); }
.tasty-recipes-rating.tasty-recipes-clip-40 {
-webkit-clip-path: polygon(0 0, 40% 0%, 40% 100%, 0% 100%);
clip-path: polygon(0 0, 40% 0%, 40% 100%, 0% 100%); }
.tasty-recipes-rating.tasty-recipes-clip-50 {
-webkit-clip-path: polygon(0 0, 50% 0%, 50% 100%, 0% 100%);
clip-path: polygon(0 0, 50% 0%, 50% 100%, 0% 100%); }
.tasty-recipes-rating.tasty-recipes-clip-60 {
-webkit-clip-path: polygon(0 0, 60% 0%, 60% 100%, 0% 100%);
clip-path: polygon(0 0, 60% 0%, 60% 100%, 0% 100%); }
.tasty-recipes-rating.tasty-recipes-clip-70 {
-webkit-clip-path: polygon(0 0, 70% 0%, 70% 100%, 0% 100%);
clip-path: polygon(0 0, 70% 0%, 70% 100%, 0% 100%); }
.tasty-recipes-rating.tasty-recipes-clip-80 {
-webkit-clip-path: polygon(0 0, 80% 0%, 80% 100%, 0% 100%);
clip-path: polygon(0 0, 80% 0%, 80% 100%, 0% 100%); }
.tasty-recipes-rating.tasty-recipes-clip-90 {
-webkit-clip-path: polygon(0 0, 90% 0%, 90% 100%, 0% 100%);
clip-path: polygon(0 0, 90% 0%, 90% 100%, 0% 100%); }
.tasty-recipes-nutrition ul {
list-style-type: none;
margin: 0;
padding: 0; }
.tasty-recipes-nutrition ul:after {
display: block;
content: ‘ ‘;
clear: both; }
.tasty-recipes-nutrition li {
float: left;
margin-right: 1em; }
.tasty-recipes-plug {
text-align: center;
margin-bottom: 1em;
display: -webkit-box;
display: flex;
-webkit-box-align: center;
align-items: center;
-webkit-box-pack: center;
justify-content: center; }
.tasty-recipes-plug a {
text-decoration: none;
box-shadow: none; }
.tasty-recipes-plug a img {
width: 150px;
height: auto;
margin: 5px 0 0 8px;
display: inline-block; }
@media print {
.tasty-recipes-no-print,
.tasty-recipes-no-print * {
display: none !important; } }
.tasty-recipes {
margin-bottom: 4em;
max-width: 700px;
background-color: #f9f9f9;
}
.tasty-recipes.tasty-recipes-has-plug {
margin-bottom: 1em;
}
.tasty-recipes-plug {
margin-bottom: 4em;
}
.tasty-recipes-print-button {
display: none;
}
.tasty-recipes-image-shim {
height: 69.5px;
clear: both;
}
.tasty-recipes-entry-header {
background-color: #f9f9f9;
padding-top: 2em;
padding-left: 2em;
padding-right: 2em;
}
.tasty-recipes-entry-header.tasty-recipes-has-image {
padding-top: 0px;
}
.tasty-recipes-entry-header .tasty-recipes-image {
float: none;
margin-bottom: 1em;
}
@media only screen and (min-width: 730px) {
.tasty-recipes-entry-header .tasty-recipes-image {
float: left;
margin-right: 16px;
}
}
.tasty-recipes-entry-header .tasty-recipes-image img {
float: none;
height: 150px;
width: 150px;
}
.tasty-recipes-entry-header .tasty-recipes-header-content {
min-height: 215px;
}
.tasty-recipes-entry-header h2 {
margin-bottom: 0;
margin-top: 0;
padding-top: 0;
padding-bottom: 0;
clear: none;
}
.tasty-recipes-entry-header hr {
border: 1px solid #eee;
background-color: #eee;
margin-bottom: 0;
margin-top: 1em;
margin-right: -2em;
margin-left: -2em;
}
.tasty-recipes-entry-header .tasty-recipes-rating-outer {
width: 100%;
}
.tasty-recipes-entry-header .tasty-recipes-rating-outer a {
text-decoration: none;
border: none;
display: inherit;
box-shadow: none;
}
.tasty-recipes-entry-header .tasty-recipes-rating-outer a:hover {
text-decoration: none;
}
.tasty-recipes-entry-header .tasty-recipes-rating-stars {
font-size: 18px;
}
.tasty-recipes-entry-header .tasty-recipes-rating-stars span {
margin-right: 2px;
margin-left: 2px;
color: #aaaaaa;
}
.tasty-recipes-entry-header .tasty-recipes-rating-stars span:first-child {
margin-left: 0;
}
.tasty-recipes-entry-header .tasty-recipes-rating-label {
color: #B7BBC6;
font-size: .6875em;
margin-top: 1em;
position: absolute;
}
.tasty-recipes-entry-header .tasty-recipes-rating-stars .post-ratings {
font-size: 10px;
}
.tasty-recipes-entry-header .tasty-recipes-rating-stars .post-ratings .tasty-recipes-cf-ratings-label {
margin-top: 0;
line-height: 1;
}
.tasty-recipes-entry-header .tasty-recipes-details {
margin-top: 1.5em;
color: #606060;
}
.tasty-recipes-entry-header .tasty-recipes-details ul {
list-style-type: none;
margin: 0;
padding-left: 0;
}
.tasty-recipes-entry-header .tasty-recipes-details ul li {
display: inline-block;
margin-left: 0;
padding-left: 0;
margin-right: .5em;
margin-bottom: 0;
font-size: 1em;
line-height: 1.8em;
}
.tasty-recipes-entry-header .tasty-recipes-details .detail-icon {
height: 1em;
margin-top: .4em;
}
.tasty-recipes-entry-header .tasty-recipes-details ul li {
font-size: 1em;
}
.tasty-recipes-entry-header .tasty-recipes-details .tasty-recipes-label {
margin-right: .125em;
}
.tasty-recipes-entry-header .tasty-recipes-details .detail-icon {
vertical-align: top;
margin-right: .2em;
}
@media only screen and (min-width: 730px) {
.tasty-recipes-entry-header .tasty-recipes-details {
padding-left: 166px;
}
}
.tasty-recipes-entry-content {
padding-top: 0.1em;
background: #f9f9f9;
color: #606060;
clear: both;
}
.tasty-recipes-entry-header .tasty-recipes-buttons {
margin-top: 1.25em;
margin-bottom: 1.25em;
width: 100%;
}
.tasty-recipes-entry-header .tasty-recipes-buttons:after {
content: ” “;
display: block;
clear: both;
}
.tasty-recipes-entry-header .tasty-recipes-button-wrap {
box-sizing: border-box;
}
.tasty-recipes-entry-header .tasty-recipes-buttons a {
text-transform: uppercase;
text-align: center;
display: block;
background-color: #f9f9f9;
font-size: 1em;
line-height: 1.375em;
font-weight: bold;
padding-top: 7px;
padding-bottom: 7px;
margin-top: 0;
border: 1px solid #aaaaaa;;
border-radius: 0;
text-decoration: none;
color: #aaaaaa;
}
.tasty-recipes-entry-header .tasty-recipes-buttons .button:hover {
background-color: #f9f9f9;
border: 3px solid #aaaaaa;
color: #aaaaaa;
opacity: 1;
}
.tasty-recipes-entry-content a img {
box-shadow: none;
-webkit-box-shadow: none;
}
.tasty-recipes-entry-header .tasty-recipes-buttons a:hover {
background-color: #979599;
text-decoration: none;
}
.tasty-recipes-entry-header .tasty-recipes-buttons img {
vertical-align: top;
}
.tasty-recipes-entry-header .tasty-recipes-buttons img.svg-print,
.tasty-recipes-entry-header .tasty-recipes-buttons img.svg-pinterest {
height: 1.25em;
margin-right: .375em;
margin-bottom: 0;
background: none;
display: inline-block;
box-shadow: none;
}
@media only screen and (max-width: 730px) {
.tasty-recipes-entry-header .tasty-recipes-button-wrap {
width: 100%;
}
.tasty-recipes-entry-header .tasty-recipes-button-wrap:nth-child(2) {
padding-top: 1em;
}
}
@media only screen and (min-width: 450px) {
.tasty-recipes-entry-header .tasty-recipes-buttons {
width: 100%;
float: none;
}
.tasty-recipes-entry-header .tasty-recipes-button-wrap:first-child {
width: 50%;
padding-right: 5px;
float: left;
}
.tasty-recipes-entry-header .tasty-recipes-button-wrap:last-child {
width: 50%;
padding-left: 5px;
float: right;
padding-top: 0;
}
}
@media only screen and (min-width: 730px) {
.tasty-recipes-entry-header .tasty-recipes-buttons {
padding-left: 166px;
box-sizing: border-box;
}
.tasty-recipes-header-content {
position: relative;
}
.tasty-recipes-header-content .tasty-recipes-rating-outer {
position: absolute;
top: 155px;
width: 150px;
text-align: center;
}
.tasty-recipes-header-content .tasty-recipes-rating-label {
display: block;
position: static;
margin-top: 0;
}
}
.tasty-recipes-entry-content h3 {
color: initial;
}
.tasty-recipes-entry-content h4 {
font-size: 1em;
padding-top: 0;
margin-bottom: 1.5em;
margin-top: 1.5em;
}
.tasty-recipes-entry-content hr {
background-color: #eee;
border: 1px solid #eee;
margin-top: 1em;
margin-bottom: 1em;
}
.tasty-recipes-entry-content .tasty-recipes-description,
.tasty-recipes-entry-content .tasty-recipes-ingredients,
.tasty-recipes-entry-content .tasty-recipes-instructions,
.tasty-recipes-entry-content .tasty-recipes-keywords {
padding-left: 2em;
padding-right: 2em;
}
.tasty-recipes-entry-content .tasty-recipes-description p {
margin-bottom: 1em;
}
.tasty-recipes-entry-content .tasty-recipes-ingredients ul,
.tasty-recipes-entry-content .tasty-recipes-instructions ul {
list-style-type: none;
margin-left: 0;
margin-bottom: 1.5em;
padding: 0;
}
.tasty-recipes-entry-content .tasty-recipes-ingredients ul li,
.tasty-recipes-entry-content .tasty-recipes-instructions ul li {
margin-bottom: .625em;
list-style-type: none;
position: relative;
margin-left: 2.5em;
line-height: 1.46;
}
.tasty-recipes-entry-content .tasty-recipes-ingredients ul li:before,
.tasty-recipes-entry-content .tasty-recipes-instructions ul li:before {
background-color: #aaaaaa;
-webkit-border-radius: 50%;
-moz-border-radius: 50%;
border-radius: 50%;
height: .5em;
width: .5em;
display: block;
content: ” “;
left: -1.25em;
top: .375em;
position: absolute;
}
.tasty-recipes-entry-content .tasty-recipes-ingredients ol,
.tasty-recipes-entry-content .tasty-recipes-instructions ol {
counter-reset:li;
margin-left: 0;
padding: 0;
}
.tasty-recipes-entry-content .tasty-recipes-ingredients ol > li,
.tasty-recipes-entry-content .tasty-recipes-instructions ol > li {
list-style-type: none;
position: relative;
margin-bottom: 1em;
margin-left: 2.5em;
line-height: 1.46;
}
.tasty-recipes-entry-content .tasty-recipes-ingredients ol > li:before,
.tasty-recipes-entry-content .tasty-recipes-instructions ol > li:before {
content:counter(li);
counter-increment: li;
position: absolute;
background-color: #aaaaaa;
-webkit-border-radius: 50%;
-moz-border-radius: 50%;
border-radius: 50%;
height: 1.45em;
width: 1.45em;
color: #FFF;
left: -1.25em;
transform: translateX(-50%);
line-height: 1.5em;
font-size: .6875em;
text-align: center;
top: .1875em;
}
.tasty-recipes-entry-content .tasty-recipes-ingredients li li,
.tasty-recipes-entry-content .tasty-recipes-instructions li li {
margin-top: 0.625em;
}
.tasty-recipes-entry-content .tasty-recipes-ingredients li ul,
.tasty-recipes-entry-content .tasty-recipes-ingredients li ol,
.tasty-recipes-entry-content .tasty-recipes-instructions li ul,
.tasty-recipes-entry-content .tasty-recipes-instructions li ol {
margin-bottom: 0;
}
@media only screen and (max-width: 520px) {
.tasty-recipes-entry-content .tasty-recipes-ingredients ol,
.tasty-recipes-entry-content .tasty-recipes-instructions ol {
margin-left: 0;
}
}
.tasty-recipes-entry-content .tasty-recipes-equipment {
padding-left: 2em;
padding-right: 2em;
}
.tasty-recipes-entry-content .tasty-recipe-video-embed ~ .tasty-recipes-equipment {
padding-top: 1em;
}
.tasty-recipes-video-toggle-container .tasty-recipes-video-toggle-inner:before {
background-color: #aaaaaa;
}
.tasty-recipes-entry-content .tasty-recipes-notes,
.tasty-recipes-entry-content .tasty-recipes-nutrition {
padding-bottom: 1.25em;
padding-left: 2em;
padding-right: 2em;
}
.tasty-recipes-entry-content .tasty-recipes-notes ol {
counter-reset:li;
margin-left: 0;
padding: 0;
margin-bottom: 0;
}
.tasty-recipes-entry-content .tasty-recipes-notes ul {
margin-left: 0;
padding: 0;
margin-bottom: 0;
}
.tasty-recipes-entry-content .tasty-recipes-notes p,
.tasty-recipes-entry-content .tasty-recipes-notes ul li,
.tasty-recipes-entry-content .tasty-recipes-notes ol li {
padding-left: 1.5625em;
padding-right: 1.5625em;
padding-top: 1.25em;
padding-bottom: 1.25em;
position: relative;
margin-bottom: 1.5em;
list-style-type: none;
}
.tasty-recipes-entry-content .tasty-recipes-notes p,
.tasty-recipes-entry-content .tasty-recipes-notes ul li,
.tasty-recipes-entry-content .tasty-recipes-notes ol li {
padding-left: 2.5em;
margin-left: 0;
margin-bottom: 0;
}
.tasty-recipes-entry-content .tasty-recipes-notes p:before,
.tasty-recipes-entry-content .tasty-recipes-notes ul li:before {
content: “i”;
display: block;
background-color: #aaaaaa;
-webkit-border-radius: 50%;
-moz-border-radius: 50%;
border-radius: 50%;
height: 1.3em;
width: 1.3em;
font-size: .75em;
line-height: 1.3em;
text-align: center;
color: #FFF;
position: absolute;
left: 1.167em;
top: 2.1em;
}
.tasty-recipes-entry-content .tasty-recipes-notes ol > li:before {
content:counter(li);
counter-increment: li;
position: absolute;
background-color: #aaaaaa;
-webkit-border-radius: 50%;
-moz-border-radius: 50%;
border-radius: 50%;
height: 1.45em;
width: 1.45em;
color: #FFF;
left: 2em;
transform: translateX(-50%);
line-height: 1.5em;
font-size: .6875em;
text-align: center;
top: 2.3em;
}
.tasty-recipes-entry-content .tasty-recipes-notes p:last-child {
margin-bottom: 0;
}
.tasty-recipes-entry-content .tasty-recipes-keywords {
margin-top: 1em;
margin-bottom: 1em;
color: #aaaaaa;
}
.tasty-recipes-entry-content .tasty-recipes-keywords p {
margin-bottom: 0;
font-size: 0.7em;
}
.tasty-recipes-nutrifox {
text-align: center;
margin: 0;
}
.tasty-recipes-nutrifox iframe {
width: 100%;
display: block;
margin: 0;
}
.tasty-recipes-entry-content .tasty-recipes-nutrition ul li {
float: none;
line-height: 2em;
list-style-type: none;
margin-left: 0;
padding-left: 0.833em;
}
.tasty-recipes-entry-footer {
background-color: #fff;
padding-top: 1.5625em;
padding-bottom: 1.25em;
padding-left: 2.5em;
padding-right: 2.5em;
text-align: center;
}
.tasty-recipes-entry-footer .tasty-recipes-footer-content {
display: inline-block;
}
.tasty-recipes-entry-footer img {
width: 65px;
}
.tasty-recipes-entry-footer h3 {
font-size: 1.25em;
line-height: 2.25em;
margin-top: .5em;
margin-bottom: .125em;
padding: 0;
line-height: 1em;
}
.tasty-recipes-entry-footer p {
margin-bottom: 0;
font-size: .75em;
}
.tasty-recipes-entry-footer p a {
text-decoration: underline;
box-shadow: none;
border-bottom: none;
}
.tasty-recipes-entry-footer:after {
content: ” “;
display: block;
clear:both;
}
@media only screen and (max-width: 520px) {
.tasty-recipes-entry-footer h3 {
margin-top: .5em;
margin-bottom: .5em;
}
.tasty-recipes-entry-footer {
text-align: center;
}
}
@media only screen and (min-width: 520px) {
.tasty-recipes-entry-footer img {
float: left;
}
.tasty-recipes-entry-footer h3,
.tasty-recipes-entry-footer p {
margin-left: 90px;
clear: none;
text-align: left;
}
}
.clearfix:after {
clear: both;
content: ” “;
display: table;
}
/* Print view styles */
.tasty-recipes-print-view {
font-size: 11px;
}
.tasty-recipes-print-view .tasty-recipes-print-button {
display: inline-block;
}
.tasty-recipes-print {
padding:0;
}
.tasty-recipes-print-view .tasty-recipes,
.tasty-recipes-print-view .tasty-recipes-entry-content {
background: #fff;
}
.tasty-recipes-print-view .tasty-recipes {
margin-top: 1em;
}
.tasty-recipes-print .tasty-recipes-entry-header {
background-color: inherit;
color: inherit;
padding-bottom: 0;
padding-left: 1em;
padding-right: 1em;
}
.tasty-recipes-print .tasty-recipes-entry-header .tasty-recipes-image {
transform: none;
float: left;
margin-right: 16px;
}
.tasty-recipes-print-view .tasty-recipes-entry-header .tasty-recipes-header-content {
min-height: 150px;
}
.tasty-recipes-print.tasty-recipes-has-image .tasty-recipes-entry-header h2 {
margin-top: 0;
}
.tasty-recipes-print .tasty-recipes-entry-header h2 {
color: inherit;
margin-bottom: .5em;
}
.tasty-recipes-print .tasty-recipes-entry-header hr {
display: none;
}
.tasty-recipes-print .tasty-recipes-header-content .tasty-recipes-rating-outer {
position: initial;
text-align: left;
width: unset;
top: unset;
}
.tasty-recipes-print .tasty-recipes-entry-header .tasty-recipes-rating-stars span {
color: #000;
}
.tasty-recipes-print .tasty-recipes-entry-header .tasty-recipes-details ul {
padding: 0;
clear: none;
}
.tasty-recipes-print .tasty-recipes-entry-header .tasty-recipes-details ul li {
line-height: 1.8em;
margin-bottom: 0;
}
.tasty-recipes-print .tasty-recipes-entry-header .tasty-recipes-details .detail-icon {
display: none;
}
.tasty-recipes-print-view .tasty-recipes-source-link {
text-align: center;
}
.tasty-recipes-print-view .tasty-recipes-entry-content .tasty-recipes-ingredients ul li,
.tasty-recipes-print-view .tasty-recipes-entry-content .tasty-recipes-instructions ul li,
.tasty-recipes-print-view .tasty-recipes-entry-content .tasty-recipes-ingredients ol li,
.tasty-recipes-print-view .tasty-recipes-entry-content .tasty-recipes-instructions ol li {
margin-bottom: 0;
}
.tasty-recipes-print-view .tasty-recipes-entry-content .tasty-recipes-notes p,
.tasty-recipes-print-view .tasty-recipes-entry-content .tasty-recipes-notes ul li,
.tasty-recipes-print-view .tasty-recipes-entry-content .tasty-recipes-notes ol li {
margin-top: 1rem;
padding-top: 0;
padding-bottom: 0;
}
.tasty-recipes-print-view .tasty-recipes-entry-content .tasty-recipes-notes p:before,
.tasty-recipes-print-view .tasty-recipes-entry-content .tasty-recipes-notes ul li:before {
top: 0.1em;
}
Description
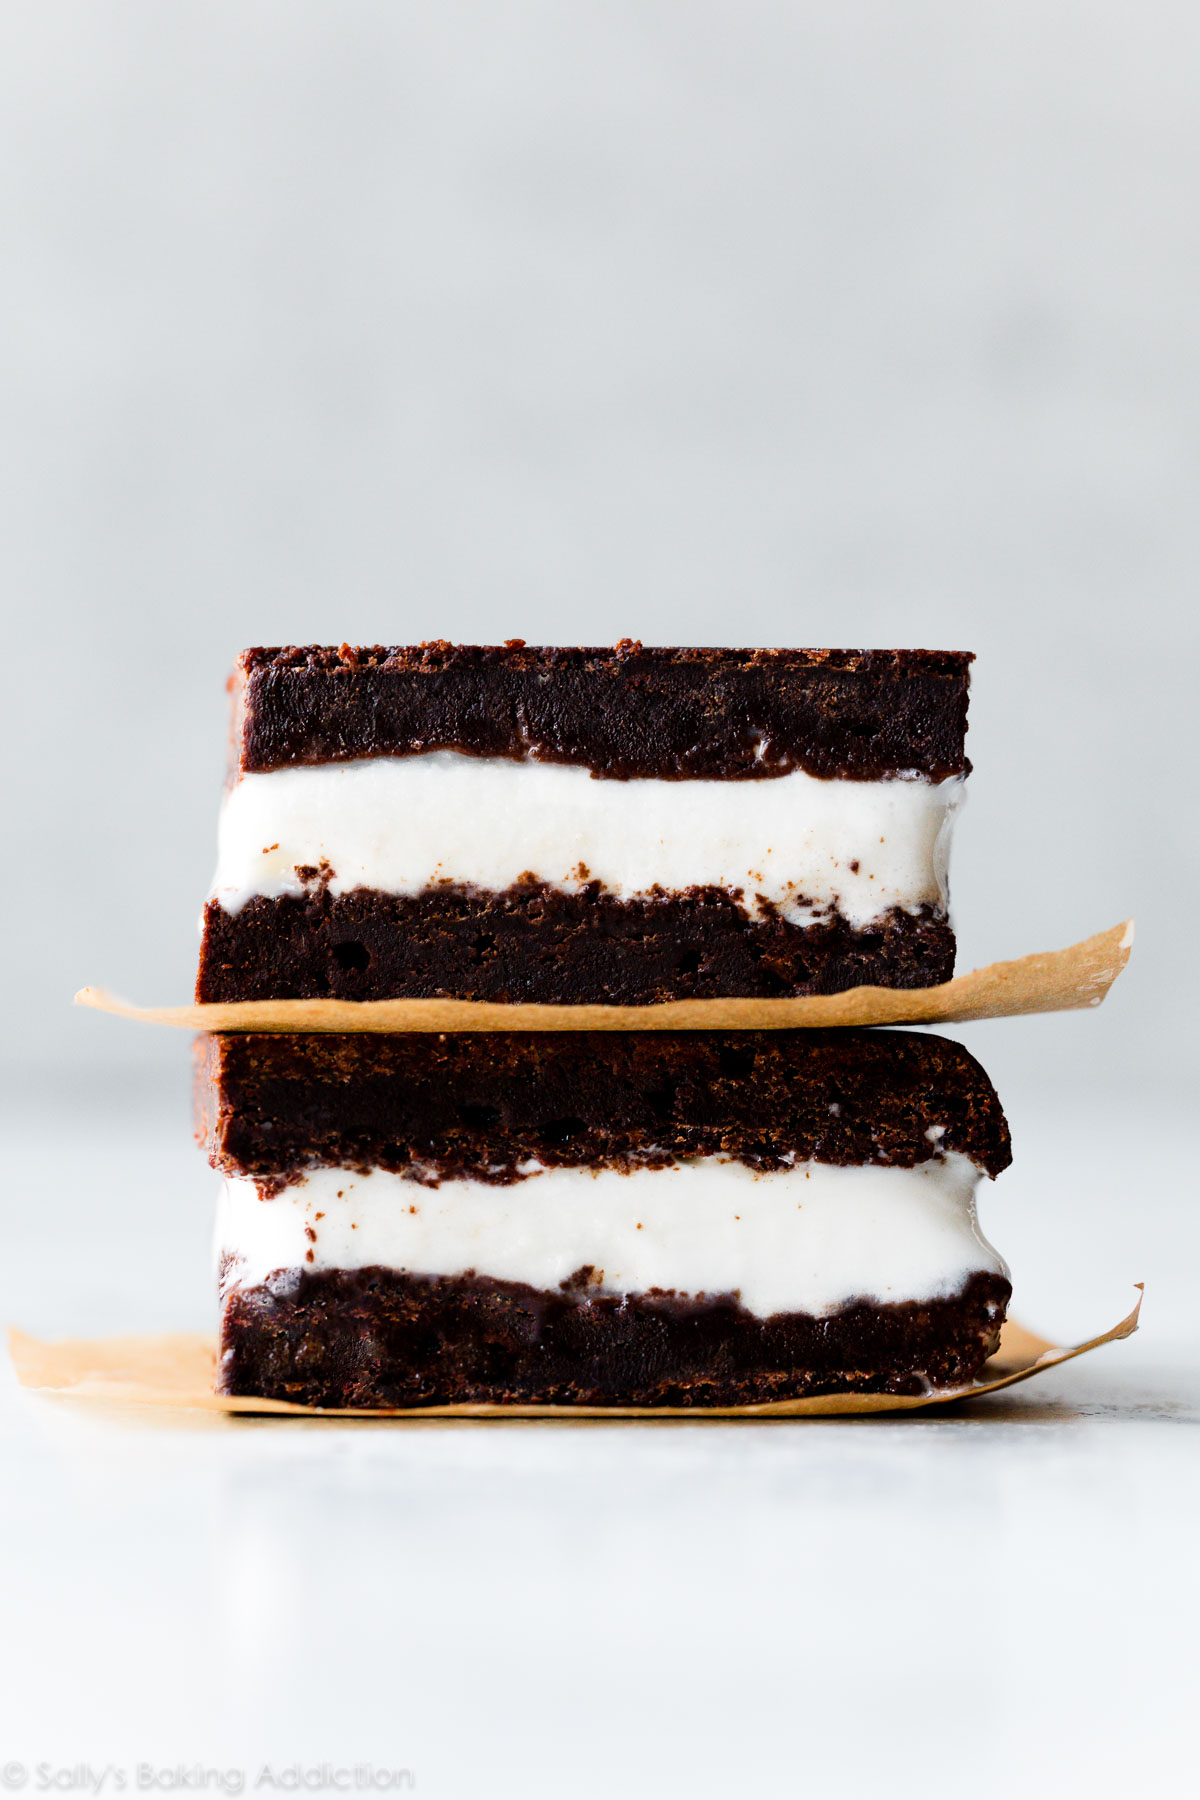
Using extra rich homemade brownies and your favorite flavor ice cream, you can make brownie ice cream sandwiches at home. My #1 tip: Give the assembled brownies plenty of time to freeze so they slice into neat squares or rectangles.
Ingredients
- 1 cup (2 sticks; 230g) unsalted butter
- 2 cups (400g) granulated sugar
- 3 large eggs, at room temperature
- 1 Tablespoon pure vanilla extract
- 1 cup (85g) unsweetened natural or dutch-process cocoa powder*
- 1 cup (125g) all-purpose flour (spoon & leveled)
- 1 teaspoon salt
- 3/4 teaspoon baking powder
- 2 quart container (1/2 gallon) vanilla ice cream (slightly softened– you can use any flavor and you’ll have a little leftover)
Instructions
- Preliminary note: For best success, I recommend reviewing the recipe notes and video tutorial above before beginning.
- Preheat the oven to 350°F (177°C) and line a 9-inch square baking pan with parchment paper, leaving enough overhang on the sides to lift the warm brownies out. Set aside. (If you have 2 identical 9-inch square baking pans, you can line both and bake the batches of brownie batter at the same time.) I don’t recommend other size baking pans. See my recipe note.
- In a microwave-safe bowl or a saucepan on the stove, melt the butter. After melting, whisk in the sugar until completely combined, then whisk in the eggs and vanilla. The batter will be light brown and a little dull looking.
- Add the cocoa powder, flour, salt, and baking powder. Fold it all together with a rubber spatula or wooden spoon. It will come together, I promise! Batter will be very thick. You will have about 4 cups of batter.
- Spoon and spread half of the batter (about 2 cups) into prepared pan. (Lightly cover remaining batter and keep at room temperature.) The batter is thick and heavy, so do your best to spread it evenly in the lined baking pan. I find the back of a spoon is most helpful. Place a small sheet of parchment paper directly on top of the brownie batter, smoothing it down as pictured in the photos and video tutorial above. The top parchment paper helps the brownies stay flat and prevents the brownies from puffing up too much.
- Bake for 15-16 minutes. I find any longer over-cooks the brownies, making the ice cream sandwiches difficult to cut and eat. Remove brownies from the oven and cool for 5 minutes in the pan. Carefully, using the overhanging parchment paper on the sides, lift the warm and soft square sheet of brownies out of the pan as a whole. Remove top piece of parchment. (You can reuse it for the top of the 2nd sheet of brownies in the next step, if desired.) Set aside.
- Line the warm pan with another sheet of parchment paper, leaving enough overhang on the sides to lift the warm brownies out. Give the remaining brownie batter a stir. It will be very thick at this point. Add a teaspoon of water to thin out if necessary. (No more.) Spoon and spread the remaining brownie batter in the pan. Place a small sheet of parchment paper directly on top of the brownie batter, just as you did before.
- Bake for 15-16 minutes. Remove brownies from the oven and cool for 15 minutes in the pan. During this cooling time, I remove the ice cream from the freezer so it has a chance to soften.
- Scoop the softened ice cream onto the warm brownie layer in the pan. You’ll use almost all of the 1/2 gallon of ice cream. Using the back of a spoon or your ice cream scoop, gently spread it into an even and thick layer.
- Carefully pick up the 1st square sheet of brownies and place on top of the ice cream layer. Gently press it down into the ice cream to help it stick. Cover the entire pan with aluminum foil or plastic wrap and freeze for at least 12 hours and up to 1 week. I find 12-18 hours is the perfect amount of time. Any less and the ice cream will still be pretty soft. The longer after 18 hours, the harder the sandwiches are to cut.
- Remove the pan of ice cream brownies from the freezer. Carefully lift them out as a whole using the parchment paper overhang on the sides. Using a very sharp knife and some arm muscle, cut into 8-12 squares or rectangles. Enjoy immediately.
- Wrap each leftover sandwich individually and store in the freezer for up to 1 month. They get a little harder the longer they sit in the freezer– if they’re super solid, let them sit out for a few minutes before enjoying.
Notes
- Two 9-inch square pans of extra thin brownies is best. I only have one 9-inch square baking pan, so I bake the batter in batches. I do not recommend one 9×13 inch pan for this recipe. Though the brownie batter will fit and you could cut the cooled sheet of brownies in half, the “sandwich” will still be too thick. An 8-inch pan is too small. You could try two 9-inch round pans of brownies, but– obviously– you won’t have even ice cream sandwich squares. For success, I recommend following the recipe.
- Cocoa Powder: You can use either natural or dutch-process cocoa powder.
- Best Ice Cream to Use: Homemade ice cream works wonderfully, but avoid homemade no churn ice cream (made with heavy cream and sweetened condensed milk) because it’s too soft. I usually use store-bought such as Breyers vanilla (or any flavor) or Dreyers/Edys classic or slow churned varieties.
Inspired by Tasty
Keywords: ice cream, ice cream sandwich, brownies