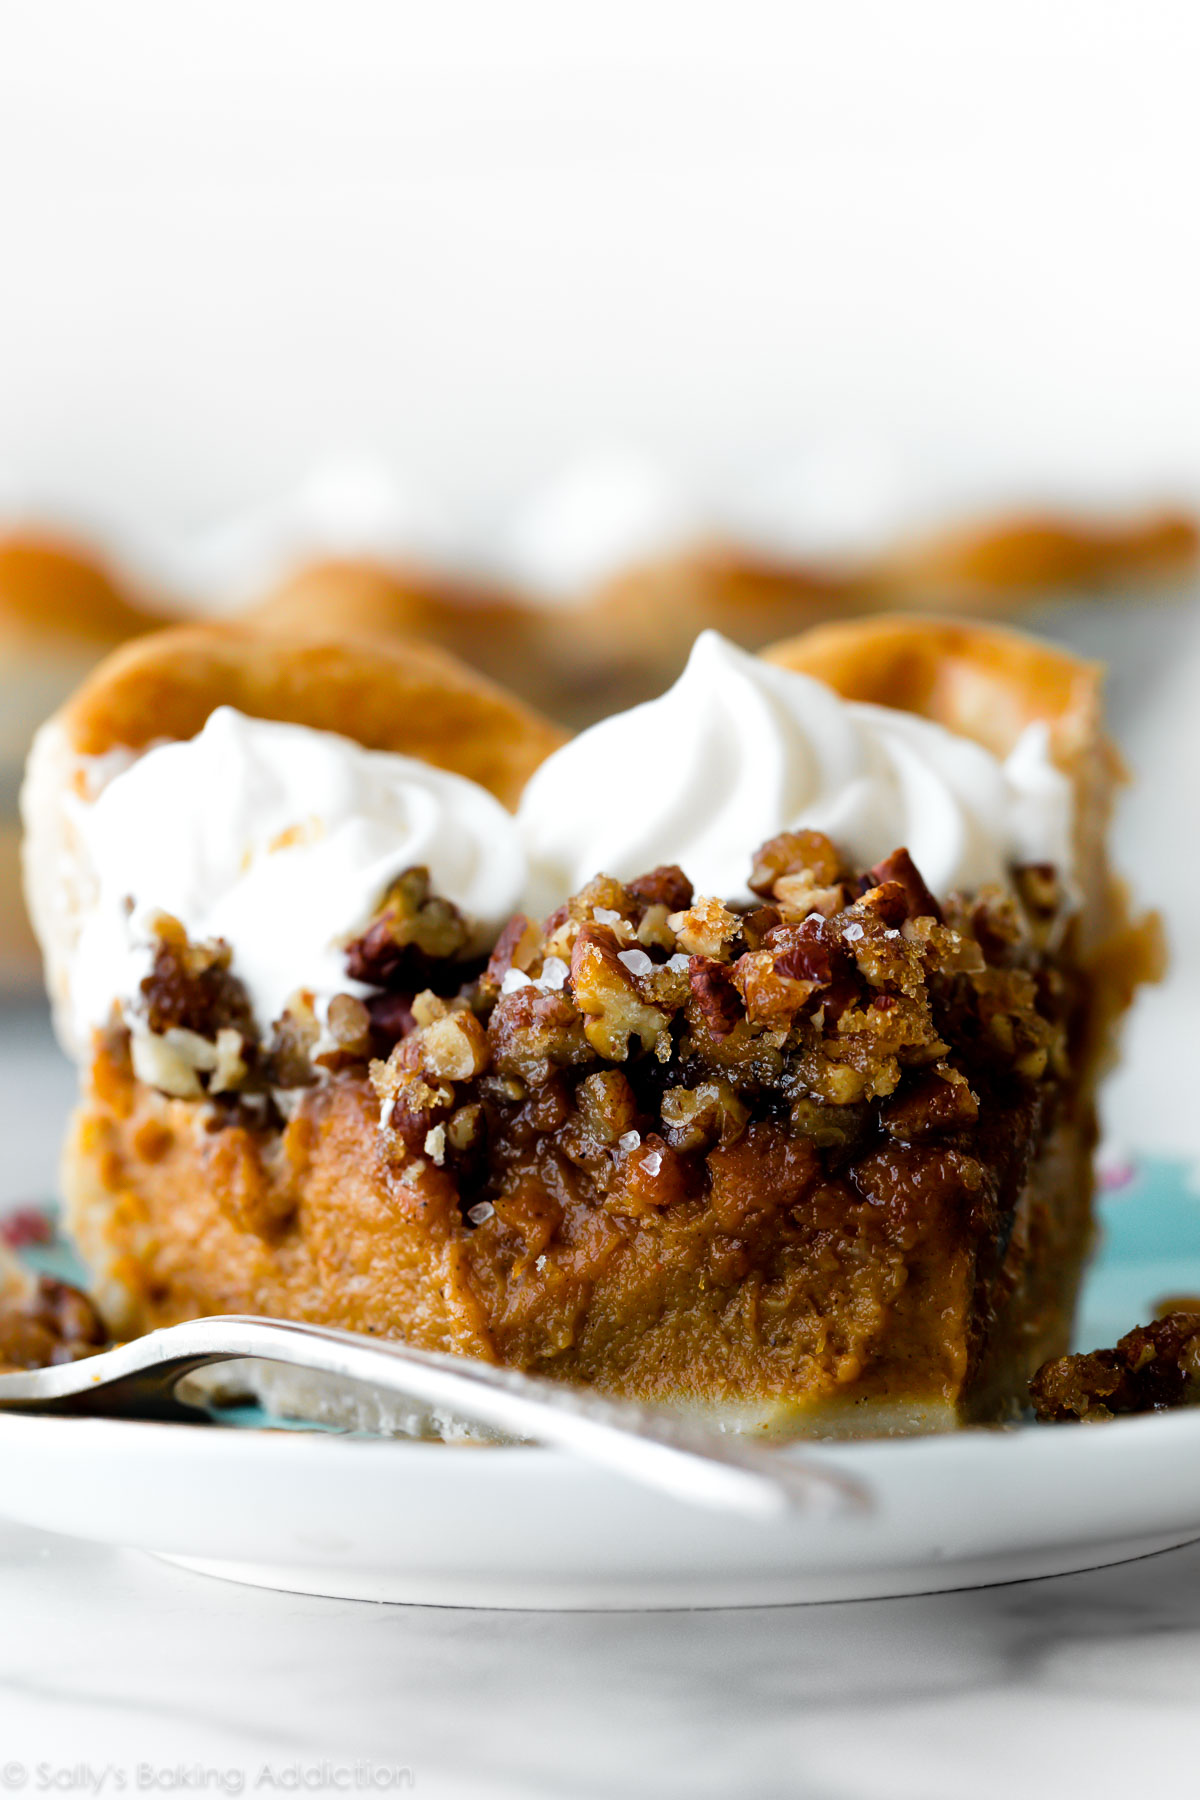
As far as Thanksgiving desserts go, pumpkin pie is an icon. And this pecan praline pumpkin pie is a fun twist on my traditional pumpkin pie recipe. I won’t call this rendition an “upgrade” since you can’t mess with perfection, but the crunchy praline topping definitely adds a tasty contrast to the smooth and spiced filling below. If you ever craved a little crunch with your pie, this recipe is for you!
For the ultimate finishing touch, I recommend topping this pecan pumpkin pie with fresh whipped cream and a sprinkle of sea salt. The crunchy salt helps cut the praline’s sweetness and whipped cream is ALWAYS a good idea with pie. Agreed?
You don’t have to wait for the partially blind baked pie crust to cool down before pouring in the filling– it can still be warm! To prevent a pale and lackluster crust, brush the partially blind baked pie crust with egg wash. Egg wash, a mixture of egg and milk, promises a golden sheen on the edges of your pie.
As the pie bakes, make the 3 ingredient praline topping. You need:
Top the pie with the praline topping, then return to the oven for about 15 more minutes.
Pecan praline pumpkin pie is perfect for entertaining because (conveniently!) it needs to cool completely before serving. I always make pumpkin pie the day ahead of time, let it cool, cover it with aluminum foil, and refrigerate overnight. You can bring to room temperature before serving or serve cold.
I honestly don’t know which is the best: the crunchy sweet/salty topping, the creamy pumpkin filling, or the flaky pie crust. But who has to pick favorites? LET’S EAT IT ALL.
.tasty-recipes-image {
float: right; }
.tasty-recipes-yield-scale {
border: 1px solid #979599;
border-radius: 2px;
color: #979599;
margin-left: 3px;
padding: 0 4px;
font-size: 0.7rem; }
.tasty-recipes-scale-container {
float: right;
padding: 0 0 1rem; }
.tasty-recipes-scale-container .tasty-recipes-scale-label {
text-transform: uppercase;
font-size: 0.6rem;
color: #979599; }
.tasty-recipes-scale-container button {
background: transparent;
border: 1px solid #979599;
border-radius: 2px;
color: #979599;
margin-left: 5px;
padding: 2px 4px; }
.tasty-recipes-scale-container button.tasty-recipes-scale-button-active {
color: #353547;
border-color: #353547; }
.tasty-recipes-scale-container button:focus {
outline: none; }
.tasty-recipes-print-button {
background-color: #666677;
display: inline-block;
padding-left: 1em;
padding-right: 1em;
padding-top: 0.5em;
padding-bottom: 0.5em;
text-decoration: none; }
a.tasty-recipes-print-button {
color: #fff; }
a.tasty-recipes-print-button:hover {
color: #fff; }
.tasty-recipes-equipment {
display: -webkit-box;
display: flex;
flex-wrap: wrap;
-webkit-box-pack: space-evenly;
justify-content: space-evenly; }
.tasty-recipes-equipment > h3 {
-webkit-box-flex: 0;
flex: 0 0 100%; }
.tasty-recipes-equipment .tasty-link-card {
-webkit-box-flex: 0;
flex: 0 0 50%;
padding: 1.5rem 1rem;
text-align: center; }
@media screen and (min-width: 500px) {
.tasty-recipes-equipment .tasty-link-card {
-webkit-box-flex: 0;
flex: 0 0 33%; } }
.tasty-recipes-equipment .tasty-link-card p {
font-weight: bold;
font-size: 1em;
margin-bottom: 0; }
.tasty-recipes-equipment .tasty-link-card p a {
color: initial; }
.tasty-recipes-equipment .tasty-link-card span {
font-size: 0.9em; }
.tasty-recipes-rating.tasty-recipes-clip-10 {
-webkit-clip-path: polygon(0 0, 10% 0%, 10% 100%, 0% 100%);
clip-path: polygon(0 0, 10% 0%, 10% 100%, 0% 100%); }
.tasty-recipes-rating.tasty-recipes-clip-20 {
-webkit-clip-path: polygon(0 0, 20% 0%, 20% 100%, 0% 100%);
clip-path: polygon(0 0, 20% 0%, 20% 100%, 0% 100%); }
.tasty-recipes-rating.tasty-recipes-clip-30 {
-webkit-clip-path: polygon(0 0, 30% 0%, 30% 100%, 0% 100%);
clip-path: polygon(0 0, 30% 0%, 30% 100%, 0% 100%); }
.tasty-recipes-rating.tasty-recipes-clip-40 {
-webkit-clip-path: polygon(0 0, 40% 0%, 40% 100%, 0% 100%);
clip-path: polygon(0 0, 40% 0%, 40% 100%, 0% 100%); }
.tasty-recipes-rating.tasty-recipes-clip-50 {
-webkit-clip-path: polygon(0 0, 50% 0%, 50% 100%, 0% 100%);
clip-path: polygon(0 0, 50% 0%, 50% 100%, 0% 100%); }
.tasty-recipes-rating.tasty-recipes-clip-60 {
-webkit-clip-path: polygon(0 0, 60% 0%, 60% 100%, 0% 100%);
clip-path: polygon(0 0, 60% 0%, 60% 100%, 0% 100%); }
.tasty-recipes-rating.tasty-recipes-clip-70 {
-webkit-clip-path: polygon(0 0, 70% 0%, 70% 100%, 0% 100%);
clip-path: polygon(0 0, 70% 0%, 70% 100%, 0% 100%); }
.tasty-recipes-rating.tasty-recipes-clip-80 {
-webkit-clip-path: polygon(0 0, 80% 0%, 80% 100%, 0% 100%);
clip-path: polygon(0 0, 80% 0%, 80% 100%, 0% 100%); }
.tasty-recipes-rating.tasty-recipes-clip-90 {
-webkit-clip-path: polygon(0 0, 90% 0%, 90% 100%, 0% 100%);
clip-path: polygon(0 0, 90% 0%, 90% 100%, 0% 100%); }
.tasty-recipes-nutrition ul {
list-style-type: none;
margin: 0;
padding: 0; }
.tasty-recipes-nutrition ul:after {
display: block;
content: ‘ ‘;
clear: both; }
.tasty-recipes-nutrition li {
float: left;
margin-right: 1em; }
.tasty-recipes-plug {
text-align: center;
margin-bottom: 1em;
display: -webkit-box;
display: flex;
-webkit-box-align: center;
align-items: center;
-webkit-box-pack: center;
justify-content: center; }
.tasty-recipes-plug a {
text-decoration: none;
box-shadow: none; }
.tasty-recipes-plug a img {
width: 150px;
height: auto;
margin: 5px 0 0 8px;
display: inline-block; }
@media print {
.tasty-recipes-no-print,
.tasty-recipes-no-print * {
display: none !important; } }
.tasty-recipes {
margin-bottom: 4em;
max-width: 700px;
background-color: #f9f9f9;
}
.tasty-recipes.tasty-recipes-has-plug {
margin-bottom: 1em;
}
.tasty-recipes-plug {
margin-bottom: 4em;
}
.tasty-recipes-print-button {
display: none;
}
.tasty-recipes-image-shim {
height: 69.5px;
clear: both;
}
.tasty-recipes-entry-header {
background-color: #f9f9f9;
padding-top: 2em;
padding-left: 2em;
padding-right: 2em;
}
.tasty-recipes-entry-header.tasty-recipes-has-image {
padding-top: 0px;
}
.tasty-recipes-entry-header .tasty-recipes-image {
float: none;
margin-bottom: 1em;
}
@media only screen and (min-width: 730px) {
.tasty-recipes-entry-header .tasty-recipes-image {
float: left;
margin-right: 16px;
}
}
.tasty-recipes-entry-header .tasty-recipes-image img {
float: none;
height: 150px;
width: 150px;
}
.tasty-recipes-entry-header .tasty-recipes-header-content {
min-height: 215px;
}
.tasty-recipes-entry-header h2 {
margin-bottom: 0;
margin-top: 0;
padding-top: 0;
padding-bottom: 0;
clear: none;
}
.tasty-recipes-entry-header hr {
border: 1px solid #eee;
background-color: #eee;
margin-bottom: 0;
margin-top: 1em;
margin-right: -2em;
margin-left: -2em;
}
.tasty-recipes-entry-header .tasty-recipes-rating-outer {
width: 100%;
}
.tasty-recipes-entry-header .tasty-recipes-rating-outer a {
text-decoration: none;
border: none;
display: inherit;
box-shadow: none;
}
.tasty-recipes-entry-header .tasty-recipes-rating-outer a:hover {
text-decoration: none;
}
.tasty-recipes-entry-header .tasty-recipes-rating-stars {
font-size: 18px;
}
.tasty-recipes-entry-header .tasty-recipes-rating-stars span {
margin-right: 2px;
margin-left: 2px;
color: #aaaaaa;
}
.tasty-recipes-entry-header .tasty-recipes-rating-stars span:first-child {
margin-left: 0;
}
.tasty-recipes-entry-header .tasty-recipes-rating-label {
color: #B7BBC6;
font-size: .6875em;
margin-top: 1em;
position: absolute;
}
.tasty-recipes-entry-header .tasty-recipes-rating-stars .post-ratings {
font-size: 10px;
}
.tasty-recipes-entry-header .tasty-recipes-rating-stars .post-ratings .tasty-recipes-cf-ratings-label {
margin-top: 0;
line-height: 1;
}
.tasty-recipes-entry-header .tasty-recipes-details {
margin-top: 1.5em;
color: #606060;
}
.tasty-recipes-entry-header .tasty-recipes-details ul {
list-style-type: none;
margin: 0;
padding-left: 0;
}
.tasty-recipes-entry-header .tasty-recipes-details ul li {
display: inline-block;
margin-left: 0;
padding-left: 0;
margin-right: .5em;
margin-bottom: 0;
font-size: 1em;
line-height: 1.8em;
}
.tasty-recipes-entry-header .tasty-recipes-details .detail-icon {
height: 1em;
margin-top: .4em;
}
.tasty-recipes-entry-header .tasty-recipes-details ul li {
font-size: 1em;
}
.tasty-recipes-entry-header .tasty-recipes-details .tasty-recipes-label {
margin-right: .125em;
}
.tasty-recipes-entry-header .tasty-recipes-details .detail-icon {
vertical-align: top;
margin-right: .2em;
}
@media only screen and (min-width: 730px) {
.tasty-recipes-entry-header .tasty-recipes-details {
padding-left: 166px;
}
}
.tasty-recipes-entry-content {
padding-top: 0.1em;
background: #f9f9f9;
color: #606060;
clear: both;
}
.tasty-recipes-entry-header .tasty-recipes-buttons {
margin-top: 1.25em;
margin-bottom: 1.25em;
width: 100%;
}
.tasty-recipes-entry-header .tasty-recipes-buttons:after {
content: ” “;
display: block;
clear: both;
}
.tasty-recipes-entry-header .tasty-recipes-button-wrap {
box-sizing: border-box;
}
.tasty-recipes-entry-header .tasty-recipes-buttons a {
text-transform: uppercase;
text-align: center;
display: block;
background-color: #f9f9f9;
font-size: 1em;
line-height: 1.375em;
font-weight: bold;
padding-top: 7px;
padding-bottom: 7px;
margin-top: 0;
border: 1px solid #aaaaaa;;
border-radius: 0;
text-decoration: none;
color: #aaaaaa;
}
.tasty-recipes-entry-header .tasty-recipes-buttons .button:hover {
background-color: #f9f9f9;
border: 3px solid #aaaaaa;
color: #aaaaaa;
opacity: 1;
}
.tasty-recipes-entry-content a img {
box-shadow: none;
-webkit-box-shadow: none;
}
.tasty-recipes-entry-header .tasty-recipes-buttons a:hover {
background-color: #979599;
text-decoration: none;
}
.tasty-recipes-entry-header .tasty-recipes-buttons img {
vertical-align: top;
}
.tasty-recipes-entry-header .tasty-recipes-buttons img.svg-print,
.tasty-recipes-entry-header .tasty-recipes-buttons img.svg-pinterest {
height: 1.25em;
margin-right: .375em;
margin-bottom: 0;
background: none;
display: inline-block;
box-shadow: none;
}
@media only screen and (max-width: 730px) {
.tasty-recipes-entry-header .tasty-recipes-button-wrap {
width: 100%;
}
.tasty-recipes-entry-header .tasty-recipes-button-wrap:nth-child(2) {
padding-top: 1em;
}
}
@media only screen and (min-width: 450px) {
.tasty-recipes-entry-header .tasty-recipes-buttons {
width: 100%;
float: none;
}
.tasty-recipes-entry-header .tasty-recipes-button-wrap:first-child {
width: 50%;
padding-right: 5px;
float: left;
}
.tasty-recipes-entry-header .tasty-recipes-button-wrap:last-child {
width: 50%;
padding-left: 5px;
float: right;
padding-top: 0;
}
}
@media only screen and (min-width: 730px) {
.tasty-recipes-entry-header .tasty-recipes-buttons {
padding-left: 166px;
box-sizing: border-box;
}
.tasty-recipes-header-content {
position: relative;
}
.tasty-recipes-header-content .tasty-recipes-rating-outer {
position: absolute;
top: 155px;
width: 150px;
text-align: center;
}
.tasty-recipes-header-content .tasty-recipes-rating-label {
display: block;
position: static;
margin-top: 0;
}
}
.tasty-recipes-entry-content h3 {
color: initial;
}
.tasty-recipes-entry-content h4 {
font-size: 1em;
padding-top: 0;
margin-bottom: 1.5em;
margin-top: 1.5em;
}
.tasty-recipes-entry-content hr {
background-color: #eee;
border: 1px solid #eee;
margin-top: 1em;
margin-bottom: 1em;
}
.tasty-recipes-entry-content .tasty-recipes-description,
.tasty-recipes-entry-content .tasty-recipes-ingredients,
.tasty-recipes-entry-content .tasty-recipes-instructions,
.tasty-recipes-entry-content .tasty-recipes-keywords {
padding-left: 2em;
padding-right: 2em;
}
.tasty-recipes-entry-content .tasty-recipes-description p {
margin-bottom: 1em;
}
.tasty-recipes-entry-content .tasty-recipes-ingredients ul,
.tasty-recipes-entry-content .tasty-recipes-instructions ul {
list-style-type: none;
margin-left: 0;
margin-bottom: 1.5em;
padding: 0;
}
.tasty-recipes-entry-content .tasty-recipes-ingredients ul li,
.tasty-recipes-entry-content .tasty-recipes-instructions ul li {
margin-bottom: .625em;
list-style-type: none;
position: relative;
margin-left: 2.5em;
line-height: 1.46;
}
.tasty-recipes-entry-content .tasty-recipes-ingredients ul li:before,
.tasty-recipes-entry-content .tasty-recipes-instructions ul li:before {
background-color: #aaaaaa;
-webkit-border-radius: 50%;
-moz-border-radius: 50%;
border-radius: 50%;
height: .5em;
width: .5em;
display: block;
content: ” “;
left: -1.25em;
top: .375em;
position: absolute;
}
.tasty-recipes-entry-content .tasty-recipes-ingredients ol,
.tasty-recipes-entry-content .tasty-recipes-instructions ol {
counter-reset:li;
margin-left: 0;
padding: 0;
}
.tasty-recipes-entry-content .tasty-recipes-ingredients ol > li,
.tasty-recipes-entry-content .tasty-recipes-instructions ol > li {
list-style-type: none;
position: relative;
margin-bottom: 1em;
margin-left: 2.5em;
line-height: 1.46;
}
.tasty-recipes-entry-content .tasty-recipes-ingredients ol > li:before,
.tasty-recipes-entry-content .tasty-recipes-instructions ol > li:before {
content:counter(li);
counter-increment: li;
position: absolute;
background-color: #aaaaaa;
-webkit-border-radius: 50%;
-moz-border-radius: 50%;
border-radius: 50%;
height: 1.45em;
width: 1.45em;
color: #FFF;
left: -1.25em;
transform: translateX(-50%);
line-height: 1.5em;
font-size: .6875em;
text-align: center;
top: .1875em;
}
.tasty-recipes-entry-content .tasty-recipes-ingredients li li,
.tasty-recipes-entry-content .tasty-recipes-instructions li li {
margin-top: 0.625em;
}
.tasty-recipes-entry-content .tasty-recipes-ingredients li ul,
.tasty-recipes-entry-content .tasty-recipes-ingredients li ol,
.tasty-recipes-entry-content .tasty-recipes-instructions li ul,
.tasty-recipes-entry-content .tasty-recipes-instructions li ol {
margin-bottom: 0;
}
@media only screen and (max-width: 520px) {
.tasty-recipes-entry-content .tasty-recipes-ingredients ol,
.tasty-recipes-entry-content .tasty-recipes-instructions ol {
margin-left: 0;
}
}
.tasty-recipes-entry-content .tasty-recipes-equipment {
padding-left: 2em;
padding-right: 2em;
}
.tasty-recipes-entry-content .tasty-recipe-video-embed ~ .tasty-recipes-equipment {
padding-top: 1em;
}
.tasty-recipes-entry-content .tasty-recipes-notes,
.tasty-recipes-entry-content .tasty-recipes-nutrition {
padding-bottom: 1.25em;
padding-left: 2em;
padding-right: 2em;
}
.tasty-recipes-entry-content .tasty-recipes-notes ol {
counter-reset:li;
margin-left: 0;
padding: 0;
margin-bottom: 0;
}
.tasty-recipes-entry-content .tasty-recipes-notes ul {
margin-left: 0;
padding: 0;
margin-bottom: 0;
}
.tasty-recipes-entry-content .tasty-recipes-notes p,
.tasty-recipes-entry-content .tasty-recipes-notes ul li,
.tasty-recipes-entry-content .tasty-recipes-notes ol li {
padding-left: 1.5625em;
padding-right: 1.5625em;
padding-top: 1.25em;
padding-bottom: 1.25em;
position: relative;
margin-bottom: 1.5em;
list-style-type: none;
}
.tasty-recipes-entry-content .tasty-recipes-notes p,
.tasty-recipes-entry-content .tasty-recipes-notes ul li,
.tasty-recipes-entry-content .tasty-recipes-notes ol li {
padding-left: 2.5em;
margin-left: 0;
margin-bottom: 0;
}
.tasty-recipes-entry-content .tasty-recipes-notes p:before,
.tasty-recipes-entry-content .tasty-recipes-notes ul li:before {
content: “i”;
display: block;
background-color: #aaaaaa;
-webkit-border-radius: 50%;
-moz-border-radius: 50%;
border-radius: 50%;
height: 1.3em;
width: 1.3em;
font-size: .75em;
line-height: 1.3em;
text-align: center;
color: #FFF;
position: absolute;
left: 1.167em;
top: 2.1em;
}
.tasty-recipes-entry-content .tasty-recipes-notes ol > li:before {
content:counter(li);
counter-increment: li;
position: absolute;
background-color: #aaaaaa;
-webkit-border-radius: 50%;
-moz-border-radius: 50%;
border-radius: 50%;
height: 1.45em;
width: 1.45em;
color: #FFF;
left: 2em;
transform: translateX(-50%);
line-height: 1.5em;
font-size: .6875em;
text-align: center;
top: 2.3em;
}
.tasty-recipes-entry-content .tasty-recipes-notes p:last-child {
margin-bottom: 0;
}
.tasty-recipes-entry-content .tasty-recipes-keywords {
margin-top: 1em;
margin-bottom: 1em;
color: #aaaaaa;
}
.tasty-recipes-entry-content .tasty-recipes-keywords p {
margin-bottom: 0;
font-size: 0.7em;
}
.tasty-recipes-nutrifox {
text-align: center;
margin: 0;
}
.tasty-recipes-nutrifox iframe {
width: 100%;
display: block;
margin: 0;
}
.tasty-recipes-entry-content .tasty-recipes-nutrition ul li {
float: none;
line-height: 2em;
list-style-type: none;
margin-left: 0;
padding-left: 0.833em;
}
.tasty-recipes-entry-footer {
background-color: #fff;
padding-top: 1.5625em;
padding-bottom: 1.25em;
padding-left: 2.5em;
padding-right: 2.5em;
text-align: center;
}
.tasty-recipes-entry-footer .tasty-recipes-footer-content {
display: inline-block;
}
.tasty-recipes-entry-footer img {
width: 65px;
}
.tasty-recipes-entry-footer h3 {
font-size: 1.25em;
line-height: 2.25em;
margin-top: .5em;
margin-bottom: .125em;
padding: 0;
line-height: 1em;
}
.tasty-recipes-entry-footer p {
margin-bottom: 0;
font-size: .75em;
}
.tasty-recipes-entry-footer p a {
text-decoration: underline;
box-shadow: none;
border-bottom: none;
}
.tasty-recipes-entry-footer:after {
content: ” “;
display: block;
clear:both;
}
@media only screen and (max-width: 520px) {
.tasty-recipes-entry-footer h3 {
margin-top: .5em;
margin-bottom: .5em;
}
.tasty-recipes-entry-footer {
text-align: center;
}
}
@media only screen and (min-width: 520px) {
.tasty-recipes-entry-footer img {
float: left;
}
.tasty-recipes-entry-footer h3,
.tasty-recipes-entry-footer p {
margin-left: 90px;
clear: none;
text-align: left;
}
}
.clearfix:after {
clear: both;
content: ” “;
display: table;
}
/* Print view styles */
.tasty-recipes-print-view {
font-size: 11px;
}
.tasty-recipes-print-view .tasty-recipes-print-button {
display: inline-block;
}
.tasty-recipes-print {
padding:0;
}
.tasty-recipes-print-view .tasty-recipes,
.tasty-recipes-print-view .tasty-recipes-entry-content {
background: #fff;
}
.tasty-recipes-print-view .tasty-recipes {
margin-top: 1em;
}
.tasty-recipes-print .tasty-recipes-entry-header {
background-color: inherit;
color: inherit;
padding-bottom: 0;
padding-left: 1em;
padding-right: 1em;
}
.tasty-recipes-print .tasty-recipes-entry-header .tasty-recipes-image {
transform: none;
float: left;
margin-right: 16px;
}
.tasty-recipes-print-view .tasty-recipes-entry-header .tasty-recipes-header-content {
min-height: 150px;
}
.tasty-recipes-print.tasty-recipes-has-image .tasty-recipes-entry-header h2 {
margin-top: 0;
}
.tasty-recipes-print .tasty-recipes-entry-header h2 {
color: inherit;
margin-bottom: .5em;
}
.tasty-recipes-print .tasty-recipes-entry-header hr {
display: none;
}
.tasty-recipes-print .tasty-recipes-header-content .tasty-recipes-rating-outer {
position: initial;
text-align: left;
width: unset;
top: unset;
}
.tasty-recipes-print .tasty-recipes-entry-header .tasty-recipes-rating-stars span {
color: #000;
}
.tasty-recipes-print .tasty-recipes-entry-header .tasty-recipes-details ul {
padding: 0;
clear: none;
}
.tasty-recipes-print .tasty-recipes-entry-header .tasty-recipes-details ul li {
line-height: 1.8em;
margin-bottom: 0;
}
.tasty-recipes-print .tasty-recipes-entry-header .tasty-recipes-details .detail-icon {
display: none;
}
.tasty-recipes-print-view .tasty-recipes-source-link {
text-align: center;
}
.tasty-recipes-print-view .tasty-recipes-entry-content .tasty-recipes-ingredients ul li,
.tasty-recipes-print-view .tasty-recipes-entry-content .tasty-recipes-instructions ul li,
.tasty-recipes-print-view .tasty-recipes-entry-content .tasty-recipes-ingredients ol li,
.tasty-recipes-print-view .tasty-recipes-entry-content .tasty-recipes-instructions ol li {
margin-bottom: 0;
}
.tasty-recipes-print-view .tasty-recipes-entry-content .tasty-recipes-notes p,
.tasty-recipes-print-view .tasty-recipes-entry-content .tasty-recipes-notes ul li,
.tasty-recipes-print-view .tasty-recipes-entry-content .tasty-recipes-notes ol li {
margin-top: 1rem;
padding-top: 0;
padding-bottom: 0;
}
.tasty-recipes-print-view .tasty-recipes-entry-content .tasty-recipes-notes p:before,
.tasty-recipes-print-view .tasty-recipes-entry-content .tasty-recipes-notes ul li:before {
top: 0.1em;
}
Description
This pecan praline pumpkin pie combines flaky pie crust, smooth and spiced pumpkin pie filling, and a sweet/salty crunchy pecan topping. For recipe success, read my recipe notes and watch the helpful video tutorial above before you begin.
Ingredients
Crust
Filling
- one 15oz can (about 2 cups; 450g) pumpkin puree*
- 2 large eggs
- 1 cup (200g) packed light or dark brown sugar
- 1 Tablespoon (8g) cornstarch
- 1/2 teaspoon salt
- 1 and 1/2 teaspoons ground cinnamon
- 1/2 teaspoon ground ginger*
- 1/4 teaspoon ground nutmeg*
- 1/8 teaspoon ground cloves*
- 1/8 teaspoon fresh ground black pepper
- 1/2 cup (120ml) heavy cream*
- 1/2 cup (120ml) whole milk*
Praline Topping
- 1 cup (130g) finely chopped pecans
- 1/2 cup (100g) packed light or dark brown sugar
- 2 Tablespoons (30g) honey*
- for garnish: sea salt and whipped cream
Instructions
- For best success, read the recipe in full before beginning.
- Pie crust: I like to make sure my pie dough is prepared before I begin making pecan praline pumpkin pie. Make pie dough the night before because it needs to chill in the refrigerator for at least 2 hours before rolling out and blind baking (next step).
- Roll out the chilled pie dough: On a floured work surface, roll out one of the disks of chilled dough (use the 2nd pie crust for another recipe!). Turn the dough about a quarter turn after every few rolls until you have a circle 12 inches in diameter. Carefully place the dough into a 9-inch pie dish. Tuck it in with your fingers, making sure it is completely smooth. To make a lovely thick edge, I do not trim excess dough around the edges. Instead, fold the excess dough back over the edge and use your hands to mold the edge into a nice thick rim around the pie. Crimp the edges with a fork or use your fingers to flute the edges. You can see me do this in the video tutorial above. Carefully line the inside of the pie with two pieces of parchment paper or aluminum foil, as shown in the photos and video above, then pour in the pie weights. Make sure the weights are evenly distributed around the pie dish. Chill the dough in the refrigerator or freezer for at least 30 minutes– this helps prevent the crust from shrinking. (You can actually fill with pie weights before or after chilling, it doesn’t make a difference.)
- Preheat oven to 375°F (190°C).
- Pre-bake the crust: Bake the cold pie crust (with weights!) for 12 minutes. Remove from the oven and cool for a few minutes as you prepare the filling. You can pre-bake the crust up to 3 days ahead of time. Cover cooled crust tightly and refrigerate until ready to fill.
- Whisk the pumpkin, eggs, brown sugar, cornstarch, salt, cinnamon, ginger, nutmeg, cloves, black pepper, cream, and milk together in a large bowl until completely combined and smooth. If desired, you can use an electric mixer for this step.
- Remove pie weights (and parchment) from crust. Pour filling into warm crust. Brush edges with egg wash. Bake for 50-55 minutes or until the center is no longer jiggly. It can still be a little sticky in the very center on top, just as long as it no longer jiggles when you slightly tap the pan. During bake time, if you find the edges of the pie crust are browning too quickly, apply a pie crust shield or a ring of aluminum foil to protect it.
- Topping: Remove pie from the oven and add the topping. I like to make the topping as the pie bakes so I have it ready. Using a fork, mix the pecans and brown sugar together. Drizzle in the honey and mix until combined. Spoon on top of the pie, then *very* gently press it down with a spoon or fork so it sticks on the filling.
- Return pie to the oven and bake for an additional 15 minutes. Use a pie crust shield to protect the crust from over-browning, if needed.
- Remove the pie from the oven and place on a wire rack to cool completely, at least 3-4 hours. If not serving right away, cover cooled pie and store at room temperature for 1 day or in the refrigerator for up to 2 days.
- Serve room temperature or cold with a sprinkle of sea salt and whipped cream. I used Ateco 849 piping tip for the whipped cream, but you can just use a spoon to top each slice with a dollop.
- Cover and store leftover pie in the refrigerator for up to 5 days.
Notes
- Make Ahead & Freezing Instructions: See post above for detailed make-ahead and freezing instructions.
- Special Tools (affiliate links): Pastry Blender, Rolling Pin, Pie Dish, Parchment Paper, Pie Weights, Pastry Brush, Pie Crust Baking Shield
- Pie Crust: Both linked pie crust recipes make 2 crusts. You only need 1 crust for this pie, so freeze the 2nd half for another use. If using store-bought pie dough, you still need to pre-bake it. If needed, you can use a graham cracker crust or gingersnap crust instead of traditional pie crust. Pre-bake the cookie crust at 350°F (177°C) for 10 minutes. No need for pie weights if using a cookie crust.
- Pumpkin: Canned pumpkin is best in this pumpkin pie recipe. If using fresh pumpkin puree, lightly blot it before adding to remove some moisture. The bake time may be longer.
- Spices: About 1 teaspoon of pumpkin pie spice can be used instead of ginger, nutmeg, and cloves.
- Heavy Cream & Milk: Do not substitute a lower fat milk– the fat in whole milk is needed. Feel free to use 1 cup of half-and-half instead of heavy cream + whole milk.
- Honey: If needed, you can substitute the honey in the praline topping with light corn syrup or even maple syrup.
Keywords: pumpkin, Thanksgiving, pie