I’ve never been a fan of lavender flavored food. Lavender scented candles? Love them. Lavender lotion? Bring it on. Lavender the color? I love you and you’re gorgeous.
But I think lavender flavored desserts taste like hand soap.
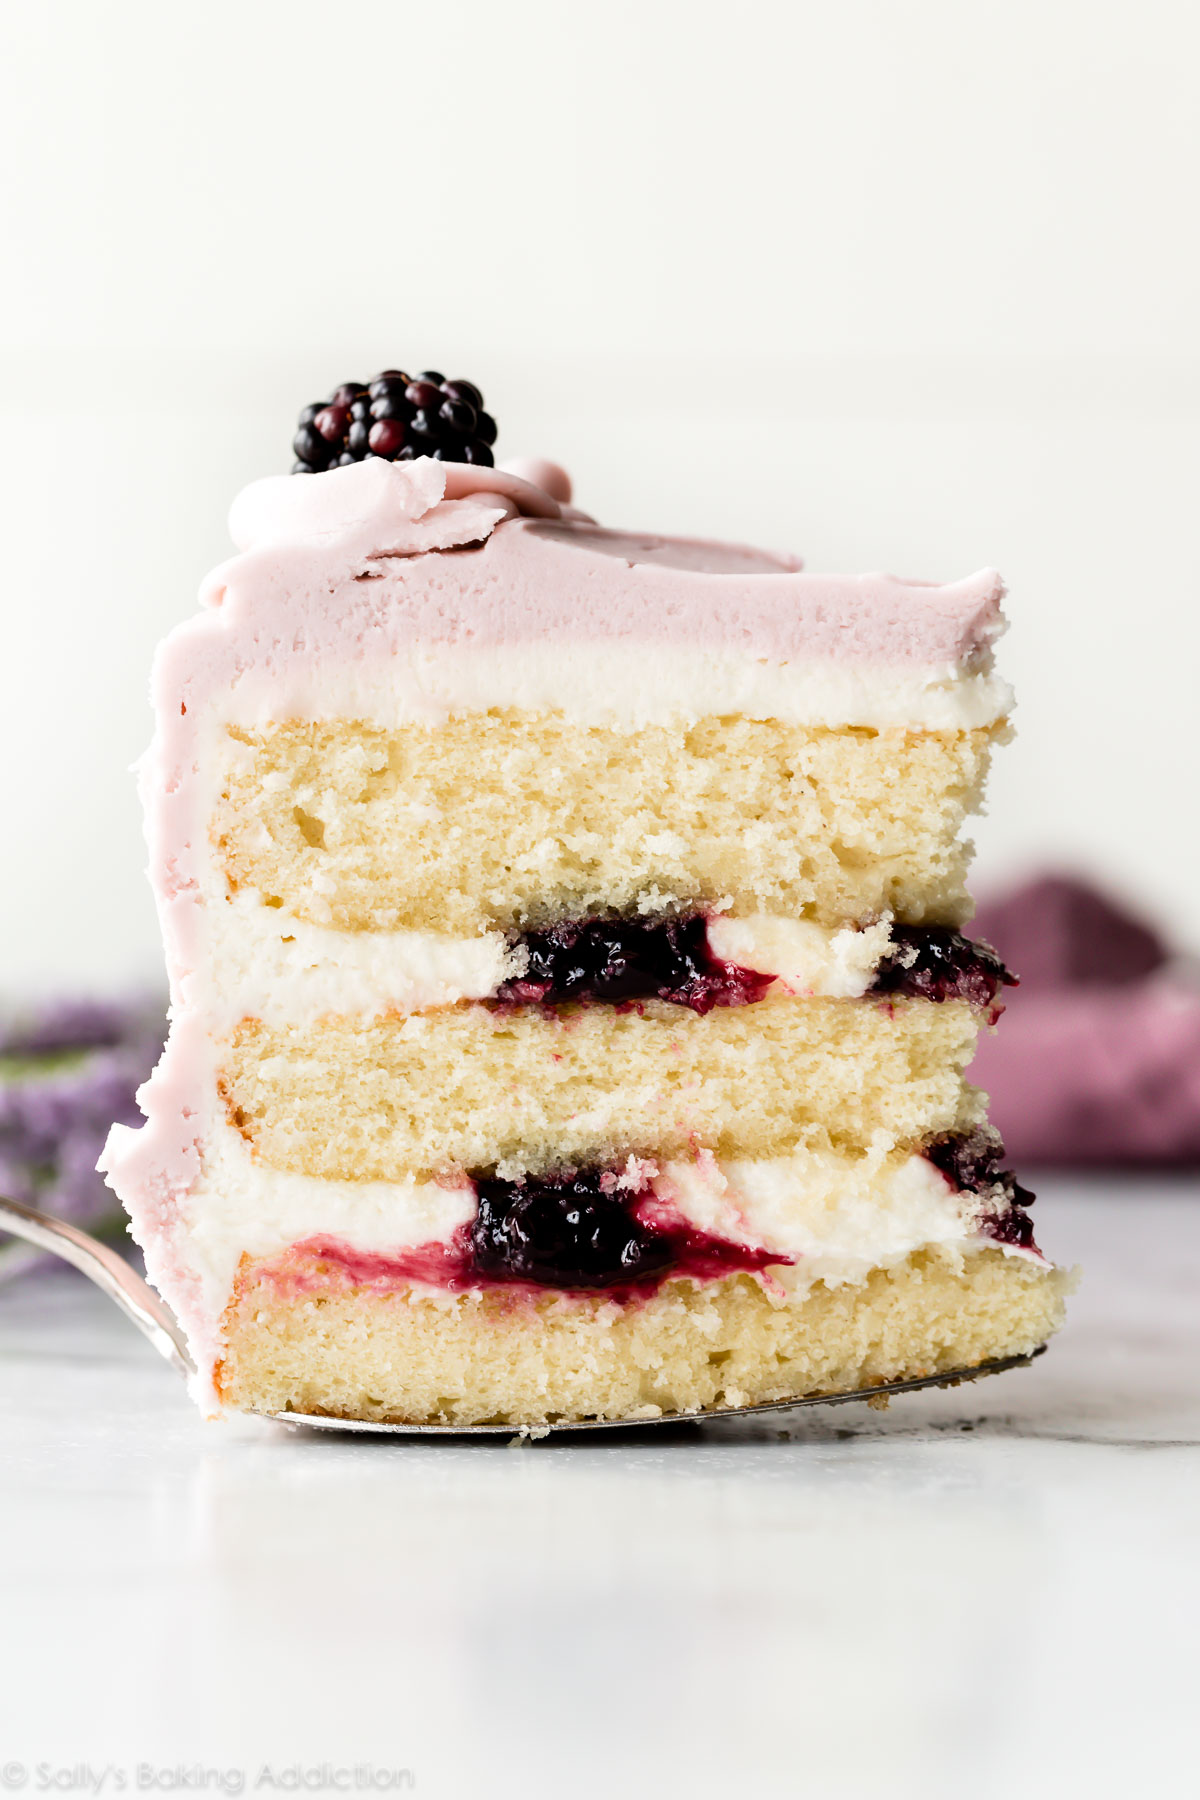
Today I’m eating my words… and another slice of this blackberry lavender cake! It’s buttery soft with a tight crumb, blackberry filling, cream cheese frosting, and delicate flavor of aromatic lavender. Not hand soapy in the slightest.
It’s my duty to bring you the best of the best and I say with pure confidence that Icing on the Cake is my new favorite book. It’s a masterpiece created for dessert lovers and bakers of any skill-set. With multiple photos for each recipe, she walks us through every single detail, every swipe of frosting, and every turn of the mixer. Her creations are delightful and epic, combining classic flavors with creative colorful design. Each page has a pop of whimsy, as if you were turning the pages of a dessert fairytale. There’s cakes, macarons, pies, and plenty of other desserts to keep your sweet tooth satisfied. Her chocolate banana pie is next on my baking list and if you ever wanted a small, medium, and large batch recipe of vanilla buttercream, this book includes each.
This is a very special cake with several different parts. Each takes time to build and prepare, so I encourage you to read through the directions before starting. Each step is totally worth it! Remember, Rome wasn’t built in a day… but this lavender cake can be!
First, let’s discuss the best lavender to use for baking. I’m new to baking with lavender and wasn’t sure what to purchase when I started. However, a quick search pulled up this wonderful multi-use dried culinary lavender. It’s edible and a wonderful addition to homemade desserts, drinks, essential oils, and more.
Pieces of dried lavender don’t leave an ideal texture in the baked cake, so let’s infuse the liquid ingredient (milk) with plenty of lavender flavor. Bring milk to a simmer, then let it steep with a couple teaspoons of dried culinary lavender. Strain the lavender through a fine mesh strainer, then let the milk cool completely before using in the cake batter. I recommend doing this in advance. If you remember, start it the night before. You can also prepare the lavender syrup ahead of time. More on that below.
There’s a fine line between pleasant lavender flavor and eating potpourri. For a light and lovely lavender flavor, stick with the recipe below! And if you don’t have a fine mesh strainer, pick one up. You need it to sift the dry ingredients, as well as for the lavender milk and lavender syrup.
Have you ever heard of the reverse creaming method for cakes? Instead of starting with the creaming butter and sugar together, the reverse creaming method begins with the dry ingredients and ends with the eggs. Tessa says that she favors this method when she’s looking for a lighter, more springy crumb. This cake is tight like pound cake, but it’s not dense. Rather, it’s velvet soft. I’m a fan!
The keys to reverse creaming are to (1) cube the butter and bring to the proper room temperature and (2) slowly stream the egg mixture into the batter at the very end.
And, like most cake recipes, be careful not to over-mix.
The secret to ultra moist cake is to brush it with a simple syrup before frosting. The syrup soaks down into the crumb, keeping the cake tender and moist for days. You can do this with mostly any cake recipe and you can even flavor the syrup, too. Today we’ll simmer the syrup with culinary lavender, then let it cool completely and strain it before using.
Make sure you level the cakes before brushing them with lavender soaking syrup. Leveling the cakes slices off the uneven domed tops, which guarantees a stronger and sturdier layer cake. You can level the cakes with a cake leveler, but I just use a serrated knife. It’s convenient and easy.
I used a pinch more lavender than what Tessa’s recipe called for. Like the lavender milk, you can prepare the soaking syrup ahead of time.
Tessa combines vanilla buttercream and cream cheese frosting together. I did this with my lemon cake and coconut cake, too. The frosting glides on seamlessly and even holds its shape with simple piping. I brought this cake along to a beach weekend with some friends and everyone not only complimented the delicious cake, but the tangy, sweet, silky soft frosting too. Keep this frosting recipe in your back pocket because it’s definitely one of the best parts!!
I bet you’re wondering about that blackberry jam?! We’ll use it when we assemble this lavender cake. Tessa teaches us how to make the most beautiful pattern that can only be seen when you cut into the cake. Make a bullseye with the frosting, then fill with blackberry jam. A large round piping tip is helpful for the frosting.
Blackberry jam is commonly found at most major grocery stores, but if you can’t get your hands on it, any flavor jam would be great or you could even try lemon curd.
Make sure you swipe a thin layer of frosting on the layers first. Otherwise, the jam could create a soggy cake. Apply a crumb coat all around the cake, then refrigerate. If you’re not familiar with a crumb coating, see my naked cake recipe and video. It’s simply a thin layer of frosting all over the cake that catches all the crumbs.
In the introduction to her book, Tessa says that if a portion of a recipe decoration doesn’t inspire or excite you, leave it off. Her blackberry lavender cake features a glorious flower crown and I knew I wouldn’t be able to do it justice. Instead, I divided the frosting in half and tinted half light purple using 2 drop of this mauve food coloring. Using an icing spatula, I covered the crumb coat with the light purple frosting and added simple piped border around the top.
Decorate the lavender cake however you feel inspired and don’t forget to check out Icing on the Cake! Lovely cake, lovely book, lovely inspiration. And now I’m looking forward to more lavender flavored desserts!
.tasty-recipes-image {
float: right; }
.tasty-recipes-yield-scale {
border: 1px solid #979599;
border-radius: 2px;
color: #979599;
margin-left: 3px;
padding: 0 4px;
font-size: 0.7rem; }
.tasty-recipes-scale-container {
float: right;
padding: 0 0 1rem; }
.tasty-recipes-scale-container .tasty-recipes-scale-label {
text-transform: uppercase;
font-size: 0.6rem;
color: #979599; }
.tasty-recipes-scale-container button {
background: transparent;
border: 1px solid #979599;
border-radius: 2px;
color: #979599;
margin-left: 5px;
padding: 2px 4px; }
.tasty-recipes-scale-container button.tasty-recipes-scale-button-active {
color: #353547;
border-color: #353547; }
.tasty-recipes-scale-container button:focus {
outline: none; }
.tasty-recipes-print-button {
background-color: #666677;
display: inline-block;
padding-left: 1em;
padding-right: 1em;
padding-top: 0.5em;
padding-bottom: 0.5em;
text-decoration: none; }
a.tasty-recipes-print-button {
color: #fff; }
a.tasty-recipes-print-button:hover {
color: #fff; }
.tasty-recipes-rating.tasty-recipes-clip-10 {
-webkit-clip-path: polygon(0 0, 10% 0%, 10% 100%, 0% 100%);
clip-path: polygon(0 0, 10% 0%, 10% 100%, 0% 100%); }
.tasty-recipes-rating.tasty-recipes-clip-20 {
-webkit-clip-path: polygon(0 0, 20% 0%, 20% 100%, 0% 100%);
clip-path: polygon(0 0, 20% 0%, 20% 100%, 0% 100%); }
.tasty-recipes-rating.tasty-recipes-clip-30 {
-webkit-clip-path: polygon(0 0, 30% 0%, 30% 100%, 0% 100%);
clip-path: polygon(0 0, 30% 0%, 30% 100%, 0% 100%); }
.tasty-recipes-rating.tasty-recipes-clip-40 {
-webkit-clip-path: polygon(0 0, 40% 0%, 40% 100%, 0% 100%);
clip-path: polygon(0 0, 40% 0%, 40% 100%, 0% 100%); }
.tasty-recipes-rating.tasty-recipes-clip-50 {
-webkit-clip-path: polygon(0 0, 50% 0%, 50% 100%, 0% 100%);
clip-path: polygon(0 0, 50% 0%, 50% 100%, 0% 100%); }
.tasty-recipes-rating.tasty-recipes-clip-60 {
-webkit-clip-path: polygon(0 0, 60% 0%, 60% 100%, 0% 100%);
clip-path: polygon(0 0, 60% 0%, 60% 100%, 0% 100%); }
.tasty-recipes-rating.tasty-recipes-clip-70 {
-webkit-clip-path: polygon(0 0, 70% 0%, 70% 100%, 0% 100%);
clip-path: polygon(0 0, 70% 0%, 70% 100%, 0% 100%); }
.tasty-recipes-rating.tasty-recipes-clip-80 {
-webkit-clip-path: polygon(0 0, 80% 0%, 80% 100%, 0% 100%);
clip-path: polygon(0 0, 80% 0%, 80% 100%, 0% 100%); }
.tasty-recipes-rating.tasty-recipes-clip-90 {
-webkit-clip-path: polygon(0 0, 90% 0%, 90% 100%, 0% 100%);
clip-path: polygon(0 0, 90% 0%, 90% 100%, 0% 100%); }
.tasty-recipes-nutrition ul {
list-style-type: none;
margin: 0;
padding: 0; }
.tasty-recipes-nutrition ul:after {
display: block;
content: ‘ ‘;
clear: both; }
.tasty-recipes-nutrition li {
float: left;
margin-right: 1em; }
.tasty-recipes-plug {
text-align: center;
margin-bottom: 1em;
display: flex;
align-items: center;
justify-content: center; }
.tasty-recipes-plug a {
text-decoration: none;
box-shadow: none; }
.tasty-recipes-plug a img {
width: 150px;
height: auto;
margin: 5px 0 0 8px;
display: inline-block; }
@media print {
.tasty-recipes-no-print,
.tasty-recipes-no-print * {
display: none !important; } }
.tasty-recipes {
margin-bottom: 4em;
max-width: 700px;
background-color: #f9f9f9;
}
.tasty-recipes.tasty-recipes-has-plug {
margin-bottom: 1em;
}
.tasty-recipes-plug {
margin-bottom: 4em;
}
.tasty-recipes-print-button {
display: none;
}
.tasty-recipes-image-shim {
height: 69.5px;
clear: both;
}
.tasty-recipes-entry-header {
background-color: #f9f9f9;
padding-top: 2em;
padding-left: 2em;
padding-right: 2em;
}
.tasty-recipes-entry-header.tasty-recipes-has-image {
padding-top: 0px;
}
.tasty-recipes-entry-header .tasty-recipes-image {
float: none;
margin-bottom: 1em;
}
@media only screen and (min-width: 730px) {
.tasty-recipes-entry-header .tasty-recipes-image {
float: left;
margin-right: 16px;
}
}
.tasty-recipes-entry-header .tasty-recipes-image img {
float: none;
height: 150px;
width: 150px;
}
.tasty-recipes-entry-header .tasty-recipes-header-content {
min-height: 215px;
}
.tasty-recipes-entry-header h2 {
margin-bottom: 0;
margin-top: 0;
padding-top: 0;
padding-bottom: 0;
clear: none;
}
.tasty-recipes-entry-header hr {
border: 1px solid #eee;
background-color: #eee;
margin-bottom: 0;
margin-top: 1em;
margin-right: -2em;
margin-left: -2em;
}
.tasty-recipes-entry-header .tasty-recipes-rating-outer {
width: 100%;
}
.tasty-recipes-entry-header .tasty-recipes-rating-outer a {
text-decoration: none;
border: none;
display: inherit;
box-shadow: none;
}
.tasty-recipes-entry-header .tasty-recipes-rating-outer a:hover {
text-decoration: none;
}
.tasty-recipes-entry-header .tasty-recipes-rating-stars {
font-size: 18px;
}
.tasty-recipes-entry-header .tasty-recipes-rating-stars span {
margin-right: 2px;
margin-left: 2px;
color: #aaaaaa;
}
.tasty-recipes-entry-header .tasty-recipes-rating-stars span:first-child {
margin-left: 0;
}
.tasty-recipes-entry-header .tasty-recipes-rating-label {
color: #B7BBC6;
font-size: .6875em;
margin-top: 1em;
position: absolute;
}
.tasty-recipes-entry-header .tasty-recipes-rating-stars .post-ratings {
font-size: 10px;
}
.tasty-recipes-entry-header .tasty-recipes-rating-stars .post-ratings .tasty-recipes-cf-ratings-label {
margin-top: 0;
line-height: 1;
}
.tasty-recipes-entry-header .tasty-recipes-details {
margin-top: 1.5em;
color: #606060;
}
.tasty-recipes-entry-header .tasty-recipes-details ul {
list-style-type: none;
margin: 0;
padding-left: 0;
}
.tasty-recipes-entry-header .tasty-recipes-details ul li {
display: inline-block;
margin-left: 0;
padding-left: 0;
margin-right: .5em;
margin-bottom: 0;
font-size: 1em;
line-height: 1.8em;
}
.tasty-recipes-entry-header .tasty-recipes-details .detail-icon {
height: 1em;
margin-top: .4em;
}
.tasty-recipes-entry-header .tasty-recipes-details ul li {
font-size: 1em;
}
.tasty-recipes-entry-header .tasty-recipes-details .tasty-recipes-label {
margin-right: .125em;
}
.tasty-recipes-entry-header .tasty-recipes-details .detail-icon {
vertical-align: top;
margin-right: .2em;
}
@media only screen and (min-width: 730px) {
.tasty-recipes-entry-header .tasty-recipes-details {
padding-left: 166px;
}
}
.tasty-recipes-entry-content {
padding-top: 0.1em;
background: #f9f9f9;
color: #606060;
clear: both;
}
.tasty-recipes-entry-header .tasty-recipes-buttons {
margin-top: 1.25em;
margin-bottom: 1.25em;
width: 100%;
}
.tasty-recipes-entry-header .tasty-recipes-buttons:after {
content: ” “;
display: block;
clear: both;
}
.tasty-recipes-entry-header .tasty-recipes-button-wrap {
box-sizing: border-box;
}
.tasty-recipes-entry-header .tasty-recipes-buttons a {
text-transform: uppercase;
text-align: center;
display: block;
background-color: #f9f9f9;
font-size: 1em;
line-height: 1.375em;
font-weight: bold;
padding-top: 7px;
padding-bottom: 7px;
margin-top: 0;
border: 1px solid #aaaaaa;;
border-radius: 0;
text-decoration: none;
color: #aaaaaa;
}
.tasty-recipes-entry-header .tasty-recipes-buttons .button:hover {
background-color: #f9f9f9;
border: 3px solid #aaaaaa;
color: #aaaaaa;
opacity: 1;
}
.tasty-recipes-entry-content a img {
box-shadow: none;
-webkit-box-shadow: none;
}
.tasty-recipes-entry-header .tasty-recipes-buttons a:hover {
background-color: #979599;
text-decoration: none;
}
.tasty-recipes-entry-header .tasty-recipes-buttons img {
vertical-align: top;
}
.tasty-recipes-entry-header .tasty-recipes-buttons img.svg-print,
.tasty-recipes-entry-header .tasty-recipes-buttons img.svg-pinterest {
height: 1.25em;
margin-right: .375em;
margin-bottom: 0;
background: none;
display: inline-block;
box-shadow: none;
}
@media only screen and (max-width: 730px) {
.tasty-recipes-entry-header .tasty-recipes-button-wrap {
width: 100%;
}
.tasty-recipes-entry-header .tasty-recipes-button-wrap:nth-child(2) {
padding-top: 1em;
}
}
@media only screen and (min-width: 450px) {
.tasty-recipes-entry-header .tasty-recipes-buttons {
width: 100%;
float: none;
}
.tasty-recipes-entry-header .tasty-recipes-button-wrap:first-child {
width: 50%;
padding-right: 5px;
float: left;
}
.tasty-recipes-entry-header .tasty-recipes-button-wrap:last-child {
width: 50%;
padding-left: 5px;
float: right;
padding-top: 0;
}
}
@media only screen and (min-width: 730px) {
.tasty-recipes-entry-header .tasty-recipes-buttons {
padding-left: 166px;
box-sizing: border-box;
}
.tasty-recipes-header-content {
position: relative;
}
.tasty-recipes-header-content .tasty-recipes-rating-outer {
position: absolute;
top: 155px;
width: 150px;
text-align: center;
}
.tasty-recipes-header-content .tasty-recipes-rating-label {
display: block;
position: static;
margin-top: 0;
}
}
.tasty-recipes-entry-content h3 {
color: initial;
}
.tasty-recipes-entry-content h4 {
font-size: 1em;
padding-top: 0;
margin-bottom: 1.5em;
margin-top: 1.5em;
}
.tasty-recipes-entry-content hr {
background-color: #eee;
border: 1px solid #eee;
margin-top: 1em;
margin-bottom: 1em;
}
.tasty-recipes-entry-content .tasty-recipes-description,
.tasty-recipes-entry-content .tasty-recipes-ingredients,
.tasty-recipes-entry-content .tasty-recipes-instructions,
.tasty-recipes-entry-content .tasty-recipes-keywords {
padding-left: 2em;
padding-right: 2em;
}
.tasty-recipes-entry-content .tasty-recipes-description p {
margin-bottom: 1em;
}
.tasty-recipes-entry-content .tasty-recipes-ingredients ul,
.tasty-recipes-entry-content .tasty-recipes-instructions ul {
list-style-type: none;
margin-left: 0;
margin-bottom: 1.5em;
padding: 0;
}
.tasty-recipes-entry-content .tasty-recipes-ingredients ul li,
.tasty-recipes-entry-content .tasty-recipes-instructions ul li {
margin-bottom: .625em;
list-style-type: none;
position: relative;
margin-left: 2.5em;
line-height: 1.46;
}
.tasty-recipes-entry-content .tasty-recipes-ingredients ul li:before,
.tasty-recipes-entry-content .tasty-recipes-instructions ul li:before {
background-color: #aaaaaa;
-webkit-border-radius: 50%;
-moz-border-radius: 50%;
border-radius: 50%;
height: .5em;
width: .5em;
display: block;
content: ” “;
left: -1.25em;
top: .375em;
position: absolute;
}
.tasty-recipes-entry-content .tasty-recipes-ingredients ol,
.tasty-recipes-entry-content .tasty-recipes-instructions ol {
counter-reset:li;
margin-left: 0;
padding: 0;
}
.tasty-recipes-entry-content .tasty-recipes-ingredients ol li,
.tasty-recipes-entry-content .tasty-recipes-instructions ol li {
list-style-type: none;
position: relative;
margin-bottom: 1em;
margin-left: 2.5em;
line-height: 1.46;
}
.tasty-recipes-entry-content .tasty-recipes-ingredients ol li:before,
.tasty-recipes-entry-content .tasty-recipes-instructions ol li:before {
content:counter(li);
counter-increment: li;
position: absolute;
background-color: #aaaaaa;
-webkit-border-radius: 50%;
-moz-border-radius: 50%;
border-radius: 50%;
height: 1.45em;
width: 1.45em;
color: #FFF;
left: -1.25em;
transform: translateX(-50%);
line-height: 1.5em;
font-size: .6875em;
text-align: center;
top: .1875em;
}
@media only screen and (max-width: 520px) {
.tasty-recipes-entry-content .tasty-recipes-ingredients ol,
.tasty-recipes-entry-content .tasty-recipes-instructions ol {
margin-left: 0;
}
}
.tasty-recipes-entry-content .tasty-recipes-notes,
.tasty-recipes-entry-content .tasty-recipes-nutrition {
padding-bottom: 1.25em;
padding-left: 2em;
padding-right: 2em;
}
.tasty-recipes-entry-content .tasty-recipes-notes ol {
counter-reset:li;
margin-left: 0;
padding: 0;
margin-bottom: 0;
}
.tasty-recipes-entry-content .tasty-recipes-notes ul {
margin-left: 0;
padding: 0;
margin-bottom: 0;
}
.tasty-recipes-entry-content .tasty-recipes-notes p,
.tasty-recipes-entry-content .tasty-recipes-notes ul li,
.tasty-recipes-entry-content .tasty-recipes-notes ol li {
padding-left: 1.5625em;
padding-right: 1.5625em;
padding-top: 1.25em;
padding-bottom: 1.25em;
position: relative;
margin-bottom: 1.5em;
list-style-type: none;
}
.tasty-recipes-entry-content .tasty-recipes-notes p,
.tasty-recipes-entry-content .tasty-recipes-notes ul li,
.tasty-recipes-entry-content .tasty-recipes-notes ol li {
padding-left: 2.5em;
margin-left: 0;
margin-bottom: 0;
}
.tasty-recipes-entry-content .tasty-recipes-notes p:before,
.tasty-recipes-entry-content .tasty-recipes-notes ul li:before {
content: “i”;
display: block;
background-color: #aaaaaa;
-webkit-border-radius: 50%;
-moz-border-radius: 50%;
border-radius: 50%;
height: 1.3em;
width: 1.3em;
font-size: .75em;
line-height: 1.3em;
text-align: center;
color: #FFF;
position: absolute;
left: 1.167em;
top: 2.1em;
}
.tasty-recipes-entry-content .tasty-recipes-notes ol li:before {
content:counter(li);
counter-increment: li;
position: absolute;
background-color: #aaaaaa;
-webkit-border-radius: 50%;
-moz-border-radius: 50%;
border-radius: 50%;
height: 1.45em;
width: 1.45em;
color: #FFF;
left: 2em;
transform: translateX(-50%);
line-height: 1.5em;
font-size: .6875em;
text-align: center;
top: 2.3em;
}
.tasty-recipes-entry-content .tasty-recipes-notes p:last-child {
margin-bottom: 0;
}
.tasty-recipes-entry-content .tasty-recipes-keywords {
margin-top: 1em;
margin-bottom: 1em;
color: #aaaaaa;
}
.tasty-recipes-entry-content .tasty-recipes-keywords p {
margin-bottom: 0;
font-size: 0.7em;
}
.tasty-recipes-nutrifox {
text-align: center;
margin: 0;
}
.tasty-recipes-nutrifox iframe {
width: 100%;
display: block;
margin: 0;
}
.tasty-recipes-entry-content .tasty-recipes-nutrition ul li {
float: none;
line-height: 2em;
list-style-type: none;
margin-left: 0;
padding-left: 0.833em;
}
.tasty-recipes-entry-footer {
background-color: #fff;
padding-top: 1.5625em;
padding-bottom: 1.25em;
padding-left: 2.5em;
padding-right: 2.5em;
text-align: center;
}
.tasty-recipes-entry-footer .tasty-recipes-footer-content {
display: inline-block;
}
.tasty-recipes-entry-footer img {
width: 65px;
}
.tasty-recipes-entry-footer h3 {
font-size: 1.25em;
line-height: 2.25em;
margin-top: .5em;
margin-bottom: .125em;
padding: 0;
line-height: 1em;
}
.tasty-recipes-entry-footer p {
margin-bottom: 0;
font-size: .75em;
}
.tasty-recipes-entry-footer p a {
text-decoration: underline;
box-shadow: none;
border-bottom: none;
}
.tasty-recipes-entry-footer:after {
content: ” “;
display: block;
clear:both;
}
@media only screen and (max-width: 520px) {
.tasty-recipes-entry-footer h3 {
margin-top: .5em;
margin-bottom: .5em;
}
.tasty-recipes-entry-footer {
text-align: center;
}
}
@media only screen and (min-width: 520px) {
.tasty-recipes-entry-footer img {
float: left;
}
.tasty-recipes-entry-footer h3,
.tasty-recipes-entry-footer p {
margin-left: 90px;
clear: none;
text-align: left;
}
}
.clearfix:after {
clear: both;
content: ” “;
display: table;
}
/* Print view styles */
.tasty-recipes-print-view {
font-size: 11px;
}
.tasty-recipes-print-view .tasty-recipes-print-button {
display: inline-block;
}
.tasty-recipes-print {
padding:0;
}
.tasty-recipes-print-view .tasty-recipes,
.tasty-recipes-print-view .tasty-recipes-entry-content {
background: #fff;
}
.tasty-recipes-print-view .tasty-recipes {
margin-top: 1em;
}
.tasty-recipes-print .tasty-recipes-entry-header {
background-color: inherit;
color: inherit;
padding-bottom: 0;
padding-left: 1em;
padding-right: 1em;
}
.tasty-recipes-print .tasty-recipes-entry-header .tasty-recipes-image {
transform: none;
float: left;
margin-right: 16px;
}
.tasty-recipes-print-view .tasty-recipes-entry-header .tasty-recipes-header-content {
min-height: 150px;
}
.tasty-recipes-print.tasty-recipes-has-image .tasty-recipes-entry-header h2 {
margin-top: 0;
}
.tasty-recipes-print .tasty-recipes-entry-header h2 {
color: inherit;
margin-bottom: .5em;
}
.tasty-recipes-print .tasty-recipes-entry-header hr {
display: none;
}
.tasty-recipes-print .tasty-recipes-header-content .tasty-recipes-rating-outer {
position: initial;
text-align: left;
width: unset;
top: unset;
}
.tasty-recipes-print .tasty-recipes-entry-header .tasty-recipes-rating-stars span {
color: #000;
}
.tasty-recipes-print .tasty-recipes-entry-header .tasty-recipes-details ul {
padding: 0;
clear: none;
}
.tasty-recipes-print .tasty-recipes-entry-header .tasty-recipes-details ul li {
line-height: 1.8em;
margin-bottom: 0;
}
.tasty-recipes-print .tasty-recipes-entry-header .tasty-recipes-details .detail-icon {
display: none;
}
.tasty-recipes-print-view .tasty-recipes-source-link {
text-align: center;
}
.tasty-recipes-print-view .tasty-recipes-entry-content .tasty-recipes-ingredients ul li,
.tasty-recipes-print-view .tasty-recipes-entry-content .tasty-recipes-instructions ul li,
.tasty-recipes-print-view .tasty-recipes-entry-content .tasty-recipes-ingredients ol li,
.tasty-recipes-print-view .tasty-recipes-entry-content .tasty-recipes-instructions ol li {
margin-bottom: 0;
}
.tasty-recipes-print-view .tasty-recipes-entry-content .tasty-recipes-notes p,
.tasty-recipes-print-view .tasty-recipes-entry-content .tasty-recipes-notes ul li,
.tasty-recipes-print-view .tasty-recipes-entry-content .tasty-recipes-notes ol li {
margin-top: 1rem;
padding-top: 0;
padding-bottom: 0;
}
.tasty-recipes-print-view .tasty-recipes-entry-content .tasty-recipes-notes p:before,
.tasty-recipes-print-view .tasty-recipes-entry-content .tasty-recipes-notes ul li:before {
top: 0.1em;
}
Description
Blackberry and lavender flavors come together in this superbly moist and tender blackberry lavender cake. The reverse creaming method guarantees a soft crumb and the lavender milk and soaking syrup promise an aromatic, but not overpowering flavor.
Ingredients
Lavender Milk
Lavender Syrup
Cake
- 1/4 cup (60g) sour cream, at room temperature
- 2 and 1/2 cups (325g) cake flour
- 1 and 1/2 cups (300g) granulated sugar
- 1 Tablespoon baking powder
- 1/2 teaspoon salt
- 1 cup (2 sticks; 230g) unsalted butter, diced & softened to room temperature
- 1 and 1/2 teaspoons pure vanilla extract
- 4 large eggs, at room temperature
Cream Cheese Buttercream & Assembly
- 1 cup (2 sticks; 230g) unsalted butter, softened to room temperature
- one 8 ounce block (224g) full-fat cream cheese, softened to room temperature*
- 5 and 1/2 cups (660g) confectioners’ sugar
- 2 Tablespoons (30ml) whole milk
- 2 teaspoons pure vanilla extract
- 1/8 teaspoon salt
- 1/2 – 1 cup (120ml-240ml) blackberry jam
- optional: purple or mauve food coloring
- optional: blackberries for garnish
Instructions
- Make the lavender milk: In a small saucepan over low heat, bring the milk to a simmer. Remove from heat and immediately add the lavender. Set aside to steep for 20 minutes. Strain the milk through a fine-mesh sieve set over a bowl, then discard the lavender. Cool milk completely before using in cake batter. Can be made 1-2 days ahead and stored in the refrigerator. Bring to room temperature before using.
- Make the lavender syrup: In a small saucepan over medium-high heat, bring the sugar and 1/2 cup water to a boil. Once boiling, reduce the heat to low and add the lavender. Simmer the syrup for 10 minutes. Remove from heat and steep until completely cool. Strain the syrup through a fine-mesh sieve set over a bowl, then discard the lavender. You will use this “soaking syrup” in step 8. Can be made 1-2 days ahead. Cover and keep at room temperature until ready to use.
- Make the cake: Preheat the oven to 350°F (177°C). Grease three 8-inch cake pans, line with parchment paper, then grease the parchment paper. Parchment paper helps the cakes seamlessly release from the pans.
- Stir the sour cream and cooled lavender milk together until combined. Set aside.
- Sift the cake flour, sugar, baking powder, and salt in the bowl of a stand mixer. (Or if using a handheld mixer, any large mixing bowl.) With the paddle attachment, beat the ingredients together on low speed for a few seconds to gently combine. Add the butter, vanilla, and about 1/2 of the lavender milk/sour cream mixture. Mix on medium speed until the dry ingredients are moistened, about 1 minute. Stop the mixer and scrape down the sides and up the bottom of the bowl.
- Whisk the eggs into the remaining lavender milk/sour cream mixture. With the mixer running on medium speed, add the egg mixture in 3 additions, mixing for about 15 seconds after each addition. Stop the mixer and scrape down the sides and up the bottom of the bowl, then mix for about 15 more seconds until batter is completely combined. Avoid over-mixing. Some small lumps are OK.
- Pour batter evenly into cake pans. If desired, weigh them to ensure accuracy. Bake for around 20-22 minutes or until the cakes are baked through. To test for doneness, insert a toothpick into the center of the cake. If it comes out clean, it’s done. Allow cakes to cool completely in the pans set on a wire rack. The cakes must be completely cool before leveling and frosting.
- Using a large serrated knife, slice a thin layer off the tops of the cakes to create a flat surface. Discard (or crumble over ice cream!). Generously brush lavender syrup on the top of each cake. I use every last drop!
- Make the frosting: In a large bowl using a hand-held mixer or stand mixer fitted with a whisk or paddle attachment, beat the butter and cream cheese together on medium speed until creamy and smooth, about 2 minutes. Add confectioners’ sugar, milk, vanilla extract, and salt with the mixer running on low. Increase to high speed and beat for 3 minutes. Add more confectioners’ sugar if frosting is too thin, more milk if frosting is too thick, or an extra pinch of salt if frosting is too sweet. Frosting should be spreadable and creamy, not runny. If desired, divide frosting in half and tint half light purple. I used 2 drops of this mauve food coloring.
- Assemble and decorate: Place 1 cake layer on your cake stand, cake turntable, or serving plate. Spread a thin layer of white frosting on top. Fill a piping bag fitted with a large round tip (I used Wilton 1A piping tip) with 1/2 cup of white frosting. (Or use a zipped-top bag with the corner snipped off.) Pipe a ring around the outer top edge of the cake to create a “dam.” Pipe a second ring of white frosting a couple inches in from the outer ring to create a “bull’s eye.” Spoon and spread blackberry jam in the gaps. Top with 2nd cake layer and repeat, then place 3rd cake layer on top. If there’s any remaining, spread a thin layer of white frosting all over the top and sides of cake to create a crumb coat. Chill in the refrigerator for 15 minutes. Finally, spread the purple frosting all over the top and sides. I use and recommend an icing spatula to apply the frosting. If there’s any extra frosting, pipe decor on top. I piped a swirled border with Wilton 1M piping tip. Garnish with blackberries.
- Refrigerate cake for at least 20 minutes before slicing and serving. This helps the cake hold its shape when cutting.
- Cover leftover cake tightly and store in the refrigerator for up to 5 days.
Notes
- Make Ahead & Freezing Instructions: The cake layers can be baked, cooled, brushed with syrup, and covered tightly at room temperature overnight. Likewise, the frosting can be prepared then covered and refrigerated overnight. When ready to decorate, let the frosting sit at room temperature to slightly soften for 15 minutes, then give it one more mix with the mixer on medium speed for about 1 minute before frosting cake. Frosted cake or unfrosted cake layers can be frozen up to 2-3 months. Thaw overnight in the refrigerator and bring to room temperature before brushing with syrup, decorating, and serving.
- 9-inch Cake Pans: This recipe uses three 8 inch cake pans. If desired, you can use three 9 inch cake pans instead. Bake time will be about the same, but keep a close eye on the cakes at 20 minutes and check for doneness with a toothpick. 9-inch cakes will be a little thinner.
- Cupcakes: You can use this recipe for lavender cupcakes. Fill cupcake liners 2/3 full. Bake at 350°F (177°C) for 19-21 minutes. Yields about 2-3 dozen. Brush cooled cupcakes with lavender syrup and fill with blackberry jam, if desired.
- Cream Cheese: Use block cream cheese, not cream cheese spread. Not a fan of cream cheese frosting? Frost with this vanilla buttercream instead.
- Why is everything at room temperature? All refrigerated items should be at room temperature so the batter mixes together easily and evenly. Read here for more information.
- Special Tools: Icing on the Cake Cookbook | KitchenAid Stand Mixer | KitchenAid Hand Mixer | Culinary Lavender | Fine Mesh Sieve | 8 Inch Cake Pans | Pastry Brush | Food Coloring | Piping Bags | Bench Scraper | Icing Spatula
Reprinted with permission from Icing on the Cake Cookbook by Tessa Huff
Keywords: lavender cake, cake